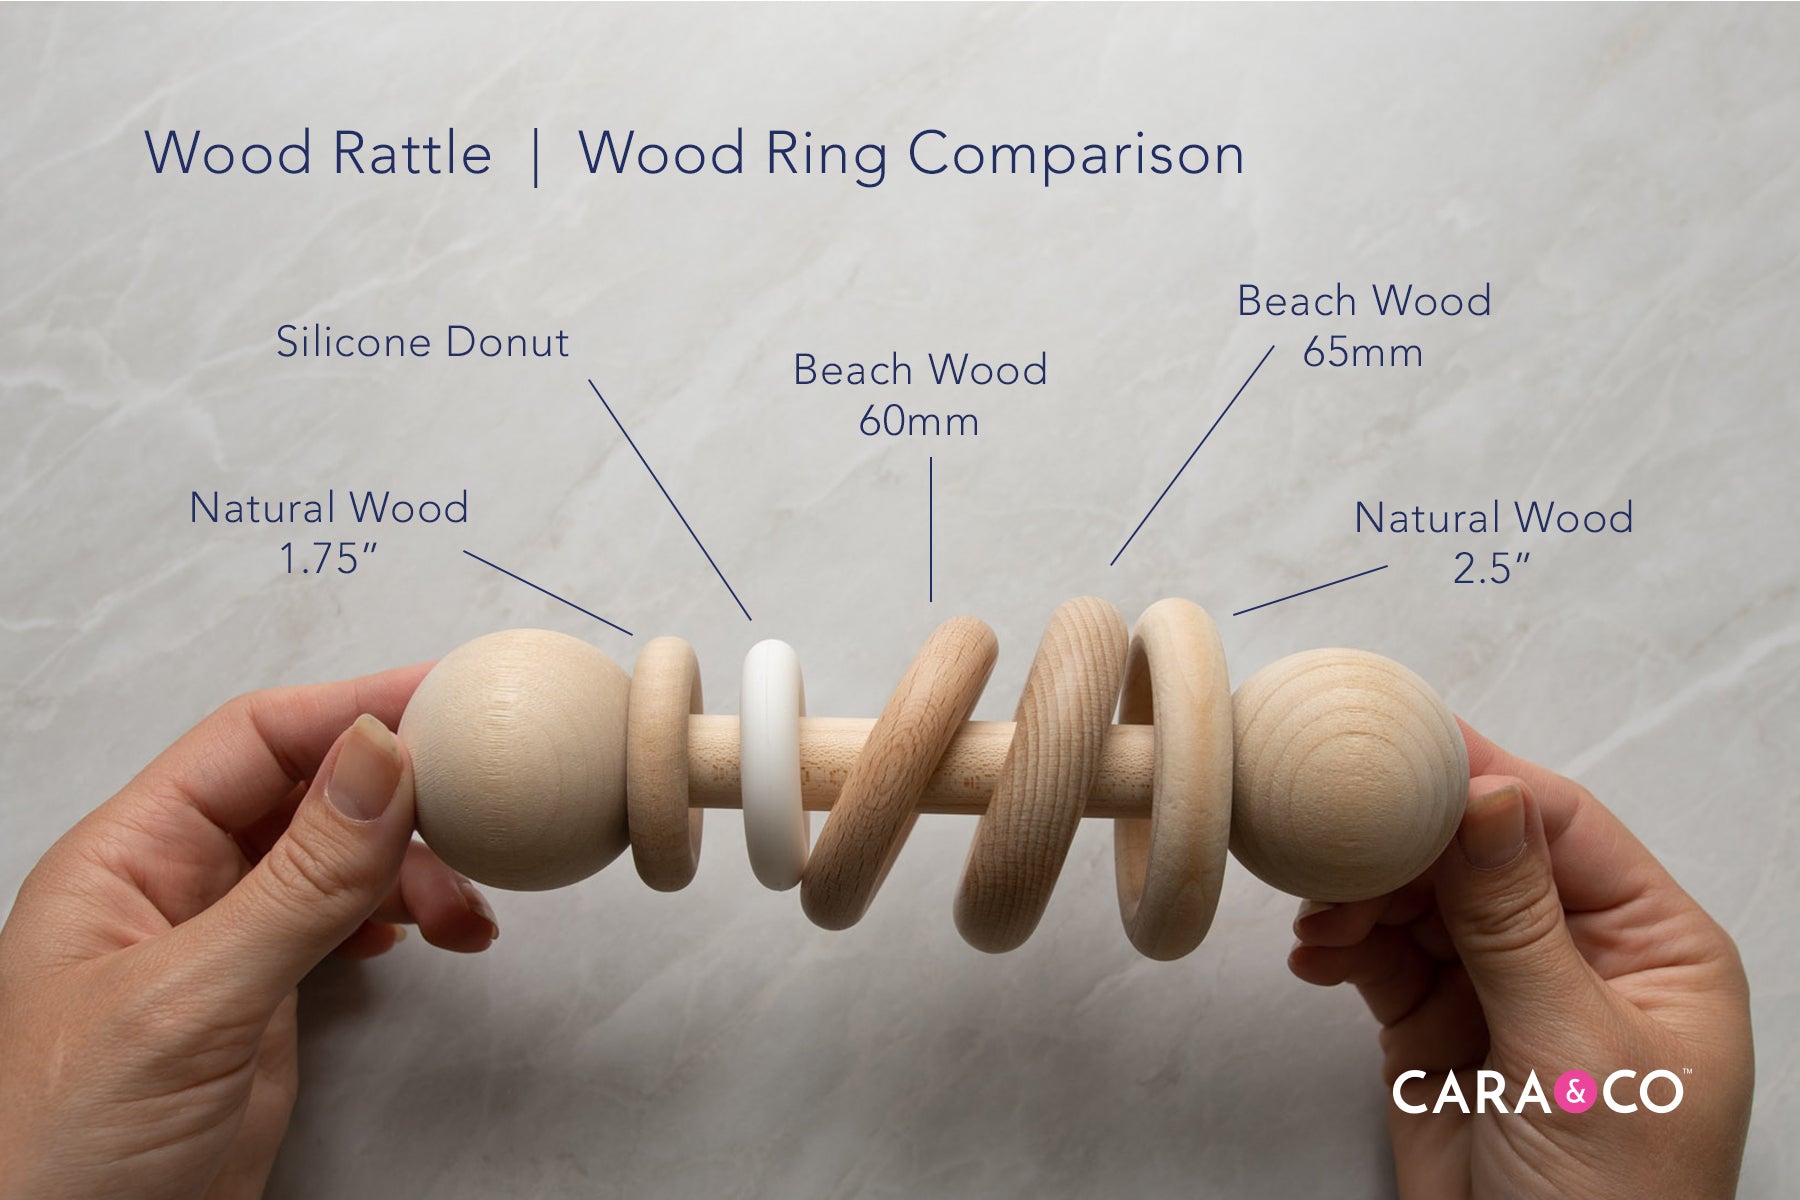
We’ve been working on getting our new wood kits JUST right. From design to functionality, we are so pleased to launch our first wood kit: Wood Rattles!
These toy rattle kits have been carefully made with beautiful hard Canadian Maple, sourced and bought from local vendors. Extra, careful attention and custom detail has been given to the proportions of this rattle, we are so excited to finally make it available!
Your kit will include two end spheres with pre drilled holes and a cut-to-size wood dowel, along with step-by-step instructions for assembly. No hardware comes with this kit, but we recommend you pick up a non-toxic wood glue from your local hardware store to use when assembling your rattles (we recommend Gorilla Glue or Titebond).

Wood Rattle Kit Product Comparisons
A beautiful design is important to your shop!
We want to make sure we give you all the information you could possibly need for these beautiful wood teething rattles. Feel free to reference the below images for comparisons of our wood rings that fit this rattle design, bead sizing, product specs, etc.


Wood Rattle Assembly
Your beautiful toy rattle design is only a few easy steps away! Please follow the assembly instructions carefully when putting your rattles together.
You can watch our YouTube short video here or follow the written instructions below!
1. Insert the dowel into the pre-drilled sphere holes to test the fit.

2. The pieces should fit snug. However, because wood is a natural product, it can sometimes expand or contract. If your dowel is not fitting the hole well and seems too large, use a fine grit sandpaper to gently sand the dowel end. Check often to see if it fits, and make sure you do not over-sand the dowel. If the dowel fits but seems a bit loose, be sure to follow step 3 very carefully.
3. Dab some high quality, strong, non-toxic wood glue on only one end face of your dowel. You can also take a small crafting paintbrush to spread the glue out evenly. Try not to put wood glue on the sides of the dowel, in order to prevent too much excess glue from coming out of the joint once the pieces are fitted together.

4. Push the dowel and the sphere together tightly. You should have only one sphere on your dowel at this point.

5. You can now slide on your rattle accessories and rings. Make sure that your accessories are no larger in diameter than the sphere end so that nothing is able to slip off the rattle.

6. Once you are happy with your rattle design, repeat step 3 and glue the other sphere end to the dowel securely.

7. Set your finished rattle aside so that the glue can properly dry. Be sure to read the specific drying instructions on your wood glue bottle so that your final product is safely assembled.


For extra help with the assembly, watch our full video tutorial here!
SHOP OUR WOOD RATTLE KITS HERE!
We can’t wait to see how you put your own spin on this adorable kit! The options are endless! Make sure you tag us in your creations using the hashtag #createdwithcarasupply!
xo
- the girls
*At Cara & Co, we take safety seriously. We have had our custom tutorial / wood rattle design above third-party tested by a CPSC accredited testing lab to ensure it meets compliance standards for Canadian (SOR/2011-17) and US (ASTM F963-17) children's toy requirements. However, this does not remove the responsibility of each customer to ensure that the products they create from this tutorial are tested and meet all relevant compliance standards.
**The products, materials, and supplies sold by Cara & Co. Silicone Craft Supply are intended for use by adults and should never be left unattended with a child.
***Small objects and beads can present choking hazards to young children. Never leave a child unattended with beads or other products. Always dispose of any damaged product. No product is completely indestructible, and fully formed teeth could potentially damage product if chewed aggressively, so responsible attentiveness is needed for any user or purchaser. Customers should always inspect and monitor their products, discontinuing use at the first sight of damage.
****Once our products have been sold and shipped to our customers, Cara & Co Silicone Craft Supply Inc., waives all responsibility and liability from the use of our products. Customers are responsible that their final products made from our supplies meet the appropriate safety requirements for their region. Our buyers understand that by purchasing our products or using suggestions from the above tutorial, the buyer assumes any and all responsibility and liability for the use of the products.
*****Cords, clasps and pacifier clips are not intended to be chewed on and may present choking hazards.

20 comments
Hi Amy!
The pieces should fit snug. However, because wood is a natural product, it can sometimes expand or contract. If your dowel is not fitting the hole well and seems too large, use a fine grit sandpaper to gently sand the dowel end. Check often to see if it fits, and make sure you do not over-sand the dowel. Thanks for reaching out and we hope this is helpful! Xo
Hi Amy!
Great question! We would recommend using the smallest ring – Flat-Faced Maple Wood 2.25". Happy crafting! Xo
What size flat wooden rings would u use with 14mm silicone beads
The dowels do not fit in the holes very good. By thst I mean nor enough of the dowel fits in the whole
Hey Kristine!
Great question! If you are referring to the caps at the ends of the rattle, they are 1 3/4". Just so you are aware, they are included in the Wood Rattle Kit that you can purchase and not as individual pieces. We hope this was helpful! Xo