YOU GUYS. This DIY crib mobile is our boho dream!! How precious!!!

This tutorial requires a bit more product than some of our other tutorials, but we think its totally worth if for the final product! Our wood beads really shine in this adorable mobile - and we've even added a couple sprigs of spring fresh faux-greenery. Needless to say, we are in loooove. Sarah's gonna walk you through the process, so follow along and enjoy!
Supplies Needed:
- One 14” wood bamboo embroidery hoop (we got ours for $2 from our local craft store!)
- One 25m bundle of uncut nylon cord in the color wheat
- 330 x 14mm round wood beads
- 126 x 19mm round wood beads
- 36 x 22mm round wood beads
- One 3” Maple wood ring
- Optional: faux greenery
- Helpful tip: find a hook to hang your mobile on!
Step-by-Step Instructions:
1. Start by setting up a hook or workspace that you can hang your mobile on. We used our baby’s jolly jumper hook. Tie a string to your wood ring and hang it on your hook.
2. Measure out three 18ft lengths of cording. Fold them in half and loop through your wooden ring at the middle point. The lengths will be long to work with at first, but you’ll need the length for all the bead loops!

3. You may recognize this slip knot from our macrame tutorial (linked here). Cut a 1.5’ length of cord. Hold an end of this piece up to your cords. Create a loop about 3” long. Wrap it around all the cords, making sure the end piece is still out at the top and visible. Be sure to keep the string being wrapped taught, but not too tight.

4. After you’ve wrapped the cord around everything and you are happy with the length, take the other end and pull it through the loop at the bottom.

5. Gently pull the top piece of string you left out upwards. You’ll see the loop at the bottom begin to get smaller. Pull the top string until the bottom loop is gone and is partly pulled into the knot.

6. You can gently push your knot up higher to the ring to keep your cord looking neat. Trim the small string pieces sticking out of your wrapped slip knot.


7. Holding up your hoop, wrap one of the 6 long strings around the hoop once. Check the length of it and make sure that you are happy with how high or low the hoop will be held.

8. Once you are happy with the position, wrap the cord around the hoop again.

9. Loop your string around from the back and tie it around your string attached to the wood ring. Pull this knot tight.


10. Go to the opposite side of your hoop and do the same thing to a string opposite the first string you just secured. Working in opposites will help you keep the hoop level as you tie off all 6 strings. Adjust the loops and knots as you need until all the strings are holding the hoop level, also keeping the 6 strings equal distances apart.


11. When all your strings are secured and your hoop is level, take one of the strings hanging down. On that string, thread the following in this order: 5x 14mm wood beads, 5x 19mm wood beads, 5x 14mm wood beads. You should have a total of 15 beads. Slide them up to the hoop.

12. Take the strand of beads and reach it to the right, just in front of the next string loop. Wrap the string over the hoop and forwards on the left side of the bead strand.

13. Holding the strand to the hoop with one hand, loop the string back under the hoop and over the top. Feed the string through the loop you just created. Pull the knot tight. Let the string drop from there. Pick up the string from the next loop and repeat step 11-13 until you’ve gone the whole way around your hoop.


14. Once you’re back at the spot you started stringing beads, pick up the strand hanging. On that string, thread the following in this order: 5 x 14mm wood beads, 3 x 19mm wood beads, 3 x 22mm wood beads, 3 x 19mm wood beads, 5 x 14mm wood beads. You should have a total of 19 beads. Slide them up to the hoop.

15. Bring your string over to the next loop, following the same instructions as steps 12-13, looping your string onto the hoop. However, before securing the loop to the hoop, slide over the loop holding the upper row of beads to make a spot for your second row to sit on the hoop beside.

16. You will now have two strands hanging down from the same spot. Reach for the left string in behind the bead strands. Use this strand to repeat steps 14-15 until you’ve gone all the way around the hoop again with all your hanging strands.


17. We decided to do a third row of beads using the same steps. If you want to add a third row, thread the following in this order: 5 x 14mm wood beads, 5 x 19mm wood beads, 3 x 22mm wood beads, 5 x 19mm wood beads, 5 x 14mm wood beads. If it feels crowded up by the loops, slide them over on the hoop to give yourself enough space to secure your knots. Once you have finished all your hanging bead loops, slide your strands closer together on the hoop.

18. You should still have all 6 strands hanging down from your mobile. Take each of those strands and thread 25 x 14mm wood beads. Loop the last one through once more to temporarily secure it.


19. Cut a separate 1.5’ long piece of cord and have it ready. Gather up all your long beaded strands in the middle.

20. Making the same wrapped knot that you made to secure the strings to your wooden ring, wrap a string around the bottom strands and secure a wrapped knot to hold them in place. Trim the short ends of the knot.


21. Trim the length of the strings hanging from the bottom to the length you’re happy with. We trimmed our strings approximately 4-5” from the knot.
22. Want to jazz up your mobile? We found some precious faux-greenery springs and hot glued them to the loop clusters!
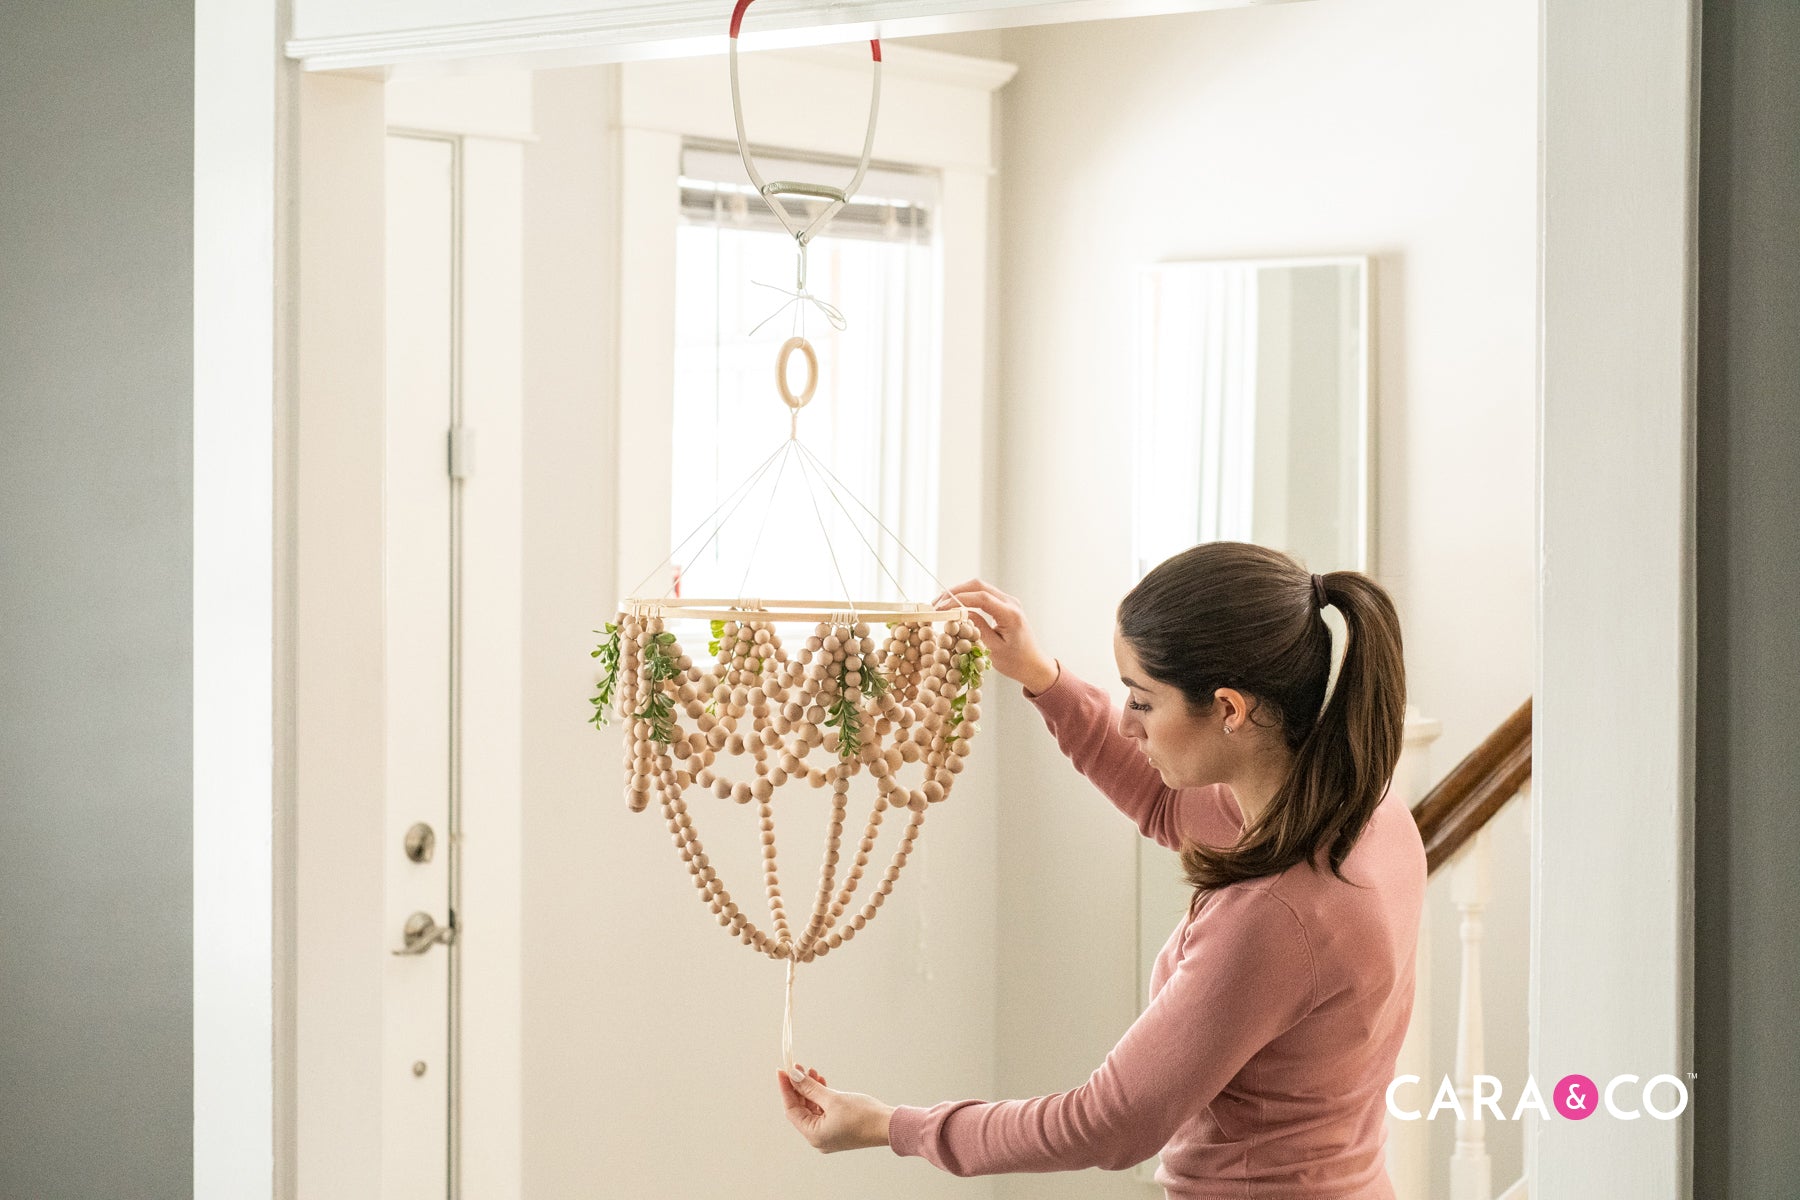
Voila! Isn't it stunning? And even better, it's such a personal gift, made with love and well-spent time for the precious baby in your life.
We can’t wait to see you try this tutorial! Tag us with your beautiful creations using the hashtag #createdwithcarasupply
Thanks for coming along with us for our exclusive tutorial project! Enjoy!
xo
- the girls
**The products, materials, and supplies sold by Cara & Co. Silicone Craft Supply are intended for use by adults and should never be left unattended with a child.
***Small objects and beads can present choking hazards to young children. Never leave a child unattended with beads or other products. Always dispose of any damaged product. No product is completely indestructible, and fully formed teeth could potentially damage product if chewed aggressively, so responsible attentiveness is needed for any user or purchaser. Customers should always inspect and monitor their products, discontinuing use at the first sight of damage.
****Once our products have been sold and shipped to our customers, Cara & Co Silicone Craft Supply Inc., waives all responsibility and liability from the use of our products. Customers are responsible that their final products made from our supplies meet the appropriate safety requirements for their region. Our buyers understand that by purchasing our products or using suggestions from the above tutorial, the buyer assumes any and all responsibility and liability for the use of the products.
*****Cords, clasps and pacifier clips are not intended to be chewed on and may present choking hazards.