Nothing says imaginative play more than a play wand! We’ve seen a few versions here and there and just couldn’t say no to making one ourselves!

The supplies are simple and you can customize your play wand with whatever character or top you want! The options are endless with our beads and wood pendants!

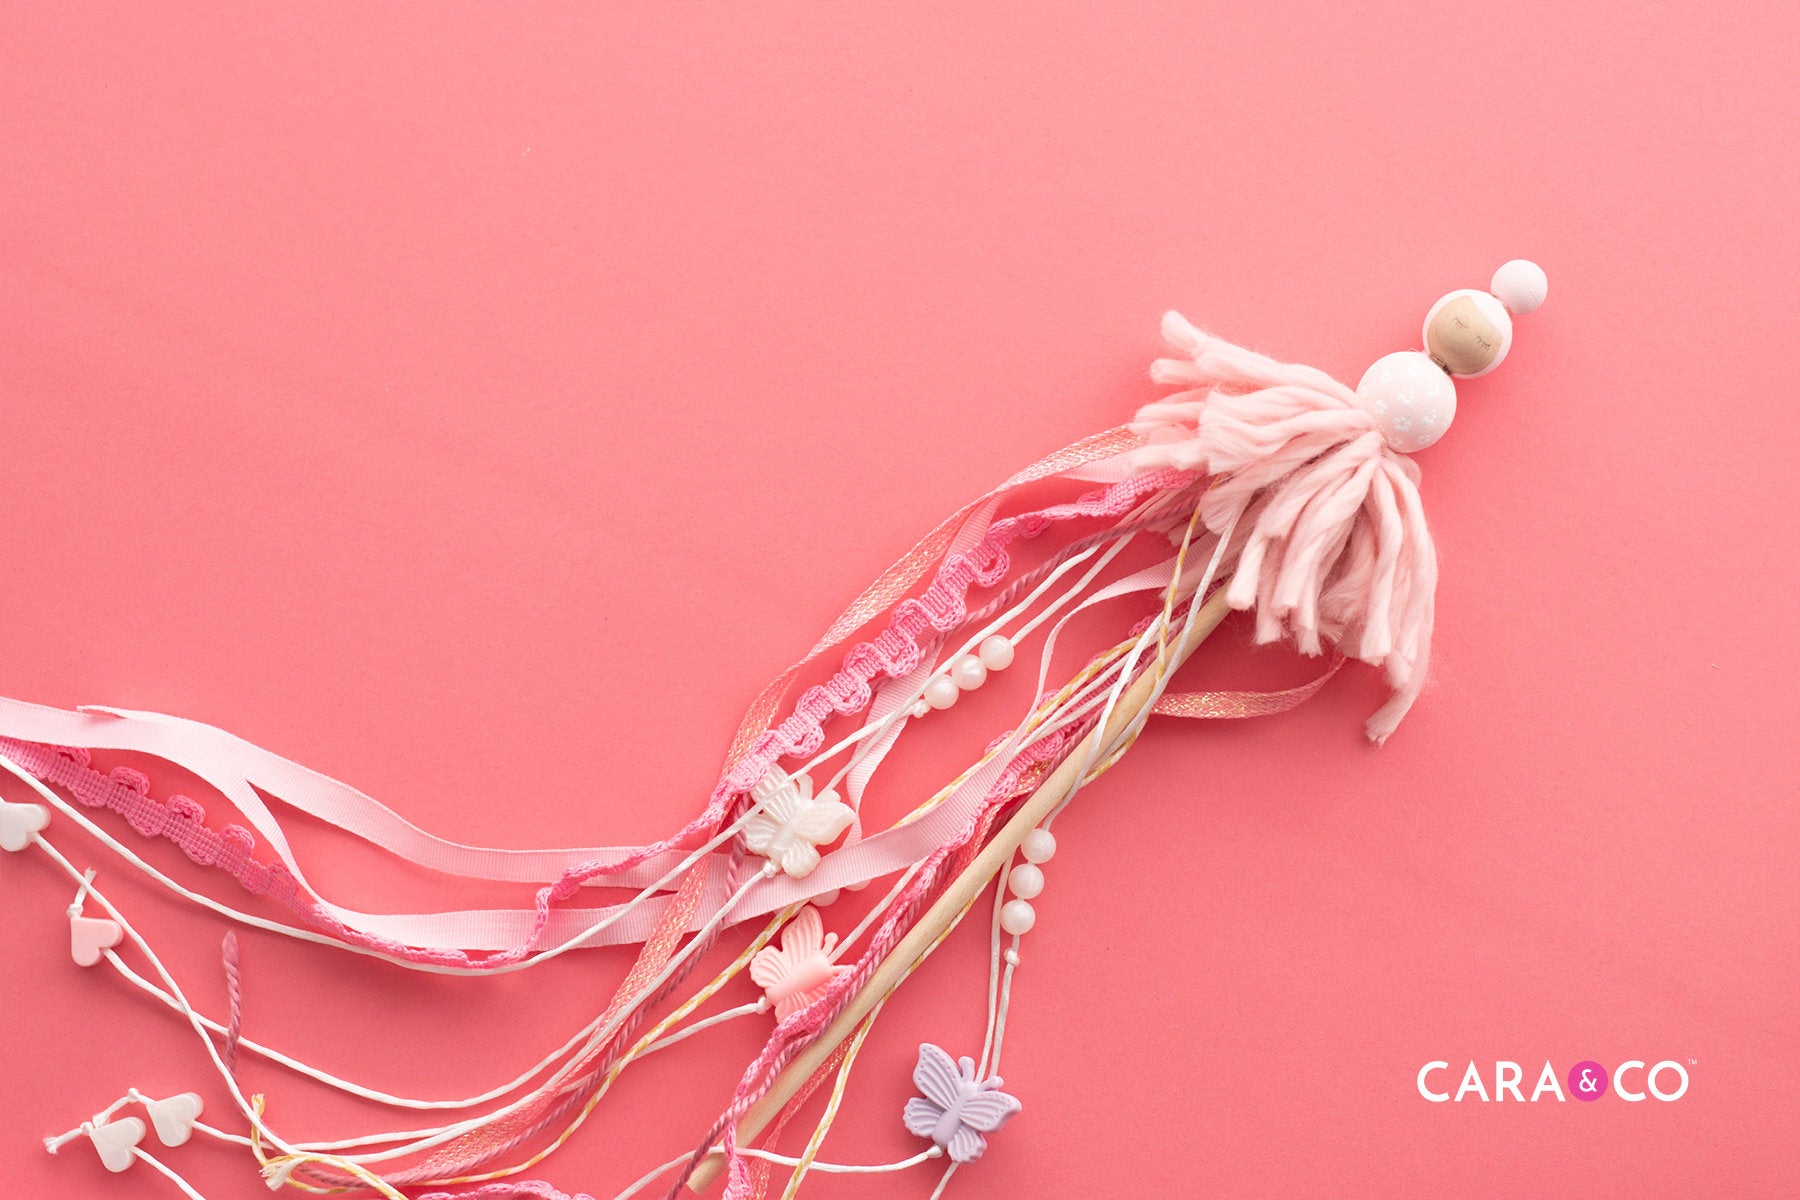
We’ll be walking you through how to make a ballerina play wand! Pull up a chair and come crafting with us!
Supplies Needed:
- 3 maple wood beads (we chose 25mm, 22mm & 14mm)
- crafting dowel (we used 0.25” thick)
- acrylic paints
- ribbons, cording & yarn
- accent beads
- utility knife
- hot glue and gun
- scissors
- pencil or fine tip marker

Step-by-Step Instructions:
1. Take your 3 maple wood beads and sketch with a pencil the areas you want to paint for your ballerina! We chose to make a pattern of flowers on the body of our ballerina (our 25mm bead), and a cute head (22mm bead) with a bun (14mm bead).


2. After your paint has dried, set aside your beads. Take your material intended for the ballerina skirt. We used thick yarn!

3. Wrap your yarn loosely around your fingers until you have a bundle that feels full. We wrapped ours around about 25 times, but this may vary depending on the thickness of the materials you choose.

4. Slide the bundle off your fingers, being careful to keep it as a rounded bundle. Set it aside. Take your yarn and cut a small length about 6-8” long. Lay it out on the table in front of you.

5. Place your bundle lengthwise across your short length. Tie up the short length using a single knot around the bundle to make it gather tightly in the middle. You should be left with what looks like an ‘8’ shape.


6. Gather up your ribbons and cut them to the length you’d like to trail! We cut ours about 2’ long! Lay them all together and find the center point. Set aside.

7. Gather up your cording and do the same!

8. Join the ribbons and cording together and hold at the center point. Lay your center point across the bundle you just made, and use the ends of the ties to also tie around your ribbons and cording. Double knot to make sure it's good and secure!


9. Take your scissors and insert the blade into your bundle loops. Cut them at the end to create your ballerina skirt. You can trim the ends of your tie lengths if they’re longer than the ballerina skirt lengths.


10. Separate out your cording strands and slide your beads on to add a bit more fun and flare! You can secure the beads with a simple single knot above or below (or both!).

11. Taking your wood dowel, test the thickness of the dowel to the opening of your beads. Depending on the dowel you select, you may or may not have to shave down the end slightly to accommodate the hole size of the beads. We took a bit off the thickness of our dowel and it fit perfectly into our painted beads! Trim the end of your dowel to be the same length as your three wood beads stacked up so that your dowel end doesn’t stick out past the last bead.


12. Take your dowel and push the shaved end up through the middle of your string/ribbon bundle.


13. Dab a hot glue bead at the base of your dowel end, up against the ballerina skirt. Slide on your largest ‘body’ bead and push into the hot glue.


14. Glue on the head, followed by the bun. If your dowel end still sticks out, no problem! Sand or cut it off and touch up the spot with acrylic paint.

15. Taking your pencil or fine tip marker draw on a face to your ballerina! Be aware that because of the porous nature of wood beads, marker ink can spread or ‘bleed’ into the wood grain. We opted for a pencil to avoid this.


Let the play begin! Your wand is ready to go!


You can customize a play wand to be any style or theme you want! We decided to play around with some of our wood pendants and the rocket ship was a winner for sure!

How cute!
Are your kids into play wands? Let them pick out their own pendant and colors! It can be such a fun craft to do together!

Comment below on what kind of play wand you would make! Be sure to tag us on Instagram if you make your own using #createdwithcarasupply We love seeing your creativity!
Happy Crafting!
Xo
-the girls
**The products, materials, and supplies sold by Cara & Co. Silicone Craft Supply Inc. are intended for use by adults and should never be left unattended with a child.
***Small objects and beads can present choking hazards to young children. Never leave a child unattended with beads or other products. Always dispose of any damaged product. No product is completely indestructible, and fully formed teeth could potentially damage product if chewed aggressively, so responsible attentiveness is needed for any user or purchaser. Customers should always inspect and monitor their products, discontinuing use at the first sight of damage.
****Once our products have been sold and shipped to our customers, Cara & Co Silicone Craft Supply Inc., waives all responsibility and liability from the use of our products. Customers are responsible that their final products made from our supplies meet the appropriate safety requirements for their region. Our buyers understand that by purchasing our products or using suggestions from the above tutorial, the buyer assumes any and all responsibility and liability for the use of the products.
*****Cords, clasps and pacifier clips are not intended to be chewed on and may present choking hazards.