
If carrying a Play Gym in your shop is new or if you’re considering making one yourself, you may be curious how to make the hanging toys that define these adorable kits!


Of course there are SO many things you can do to make a Play Gym unique, but we’ve broken down a step by step tutorial for you on how to make two different styles of hanging toys. Between these two styles, you’ll be able to customize your play gym in your own unique way, knowing that your technique is safe!

Hanging Toy Style 1: Straight Hanging Toy with a Pendant End
This style is so easy and so customizable. Change up the beads, color scheme, pendant, etc., and you’ve got a completely new product every time! We are loving neutrals right now, so we took our color cues from our Rainbows.
Supplies Needed:
- 72” Length of Regular Cording, in a color of your choice
- Pendant or Teether of your choice
- 1 x Small Wood Ring (we chose the small Original Wood Ring)
- 8-10 Medium/Large Size Silicone Beads
- Crafting Needle
- Lighter
- Scissors

Step-by-Step Instructions:
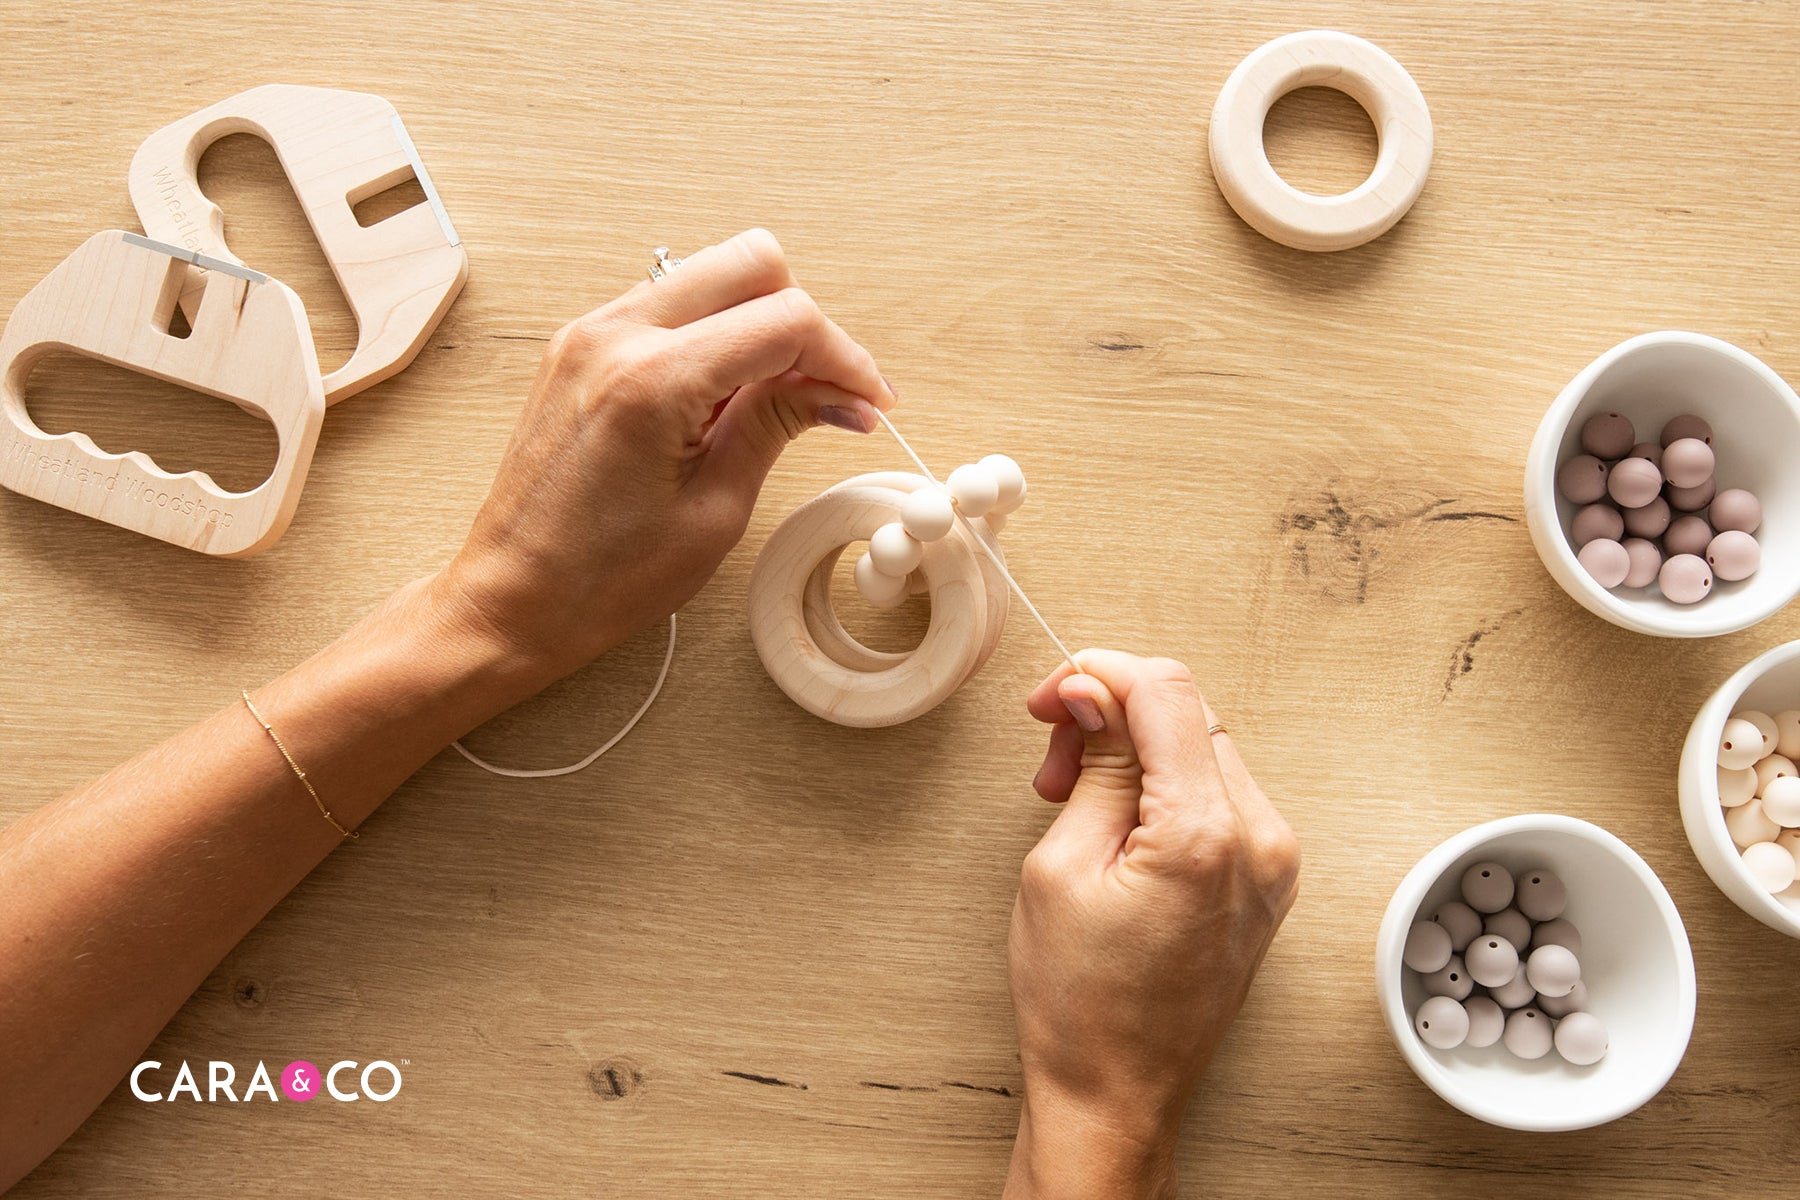
1. Taking your cord, fold your length in half. Loop knot your cord onto your wood ring.


2. **For extra safety, make a knot tight to the wood ring before you begin threading on your beads. Thread the end of your cord onto your crafting needle, and begin to then thread on your beads in the order of your choice. If you are using medium to large size beads (anything from 15mm and up), make sure that your length of beading does not exceed 6 inches. We found that 9 various beads made a good length for our hanging toy. Push up your beads all the way to the top of your string, right up against the wood ring.


3. Pull down your bottom bead about 1-2”, and pull out ONE of the two strings. Push your bottom bead back up.

4. Using the string that passes through the bottom bead, thread your string through your pendant loop hole. (Depending on the pendant you choose this hole will either be a set hole, or a large hole in your pendant's design.)

5. Pass your string through the pendant loop hole one more time to secure your pendant to your hanging toy.

6. Carefully tighten your string, push up your pendant and loop until your pendant is pushed up snug against your bottom bead, and all the cording is taught. *For extra safety, tie a knot tightly above the pendant with your cording end/bottom string. Make sure you leave enough cord to still complete the steps after this.

7. Pick up your bottom string and thread your crafting needle onto it. Carefully pass the crafting needle up through the bottom bead and pull the string through. Your strings should both be coming out between the last and second last beads.


8. Tie a double knot as tightly as you can between the last and second last beads. Trim the excess string close to the beads. Using your lighter, carefully melt the cording ends and run the flame across the knot to secure it. This will also help to shrink the cording ends slightly. (Your lighter flame may cross over your silicone beads slightly. They will not burn or discolor if the flame is low and very quickly removed.)


9. Wiggle the second last and last beads to figure out which bead your knot will fit under more easily. Pull those beads back and forth until your knot slips into one of those beads and is no longer visible. Your hanging toy should be about 10” in length total (including your wood ring for hanging onto the play gym dowel).


Hanging Toy Style 2: Round Hanging Toy Chain
Want an equally easy hanging toy style?? A Round Hanging Toy Chain! We love this style of hanging toy because there’s so many different ways you can adapt this technique. Maybe you just want to make rounds that loop into each other. Maybe you want to make a round loop as an end pendant to a straight hanging toy. Maybe your round loop connects other rings or pendants together. There are so many different ideas you can apply this style to!
We chose to work with the medium Original Wood Rings for this style so that there was enough room at the top of the toy for both the dowel and the silicone bead round. Make sure you double check our sizing chart suggestions for wood rings that fit the dowel well on our blog post!
Supplies Needed:
- 3 x 60” Length of Cording, in the color of your choice.
- 4 x Medium Wood Ring (we chose the medium Original Wood Ring)
- Approximately 30 x 15mm silicone beads (use less if your bead size is larger, and more if your bead size is smaller!)
- Crafting Needle
- Lighter
- Scissors

Step-by-Step Instructions:
1. Take your cording length and thread your crafting needle. Thread approximately 10 beads, or however many you like the look of, onto your cord. (*For extra safety and strength, you can double thread the cord through your beads)


2. Put on two of your wood rings if you are using them. You will need a wood ring to hang above and below your round bead loop.

3. Taking your two cord ends, tie a double knot as tight as you can.
4. Tie a small single knot in your excess string on both string ends, about 2" away from your double knot. Using a Knot Gripper tool, pull the ends as tightly as you can until you feel that your knot is secure. A Knot Gripper tool will give you the leverage you need to tighten knots beyond what your hands can accomplish.


5. Trim the ends close to your knot, and using your lighter, melt the small ends. Pass the lighter over your knot as well to secure it.


6. Pull and tug the neighboring beads to your knot until your knot slips into one of those beads.

7. To continue making a wood & bead chain, you would follow step 1 again and use the chain you have started as one of the two wood rings you use in step 2. Be sure to double check your length so that your chain isn’t too long.


If your shop is carrying play gyms for the first time, we would love to see what you’ve come up with to make your play gyms unique! There are so many variations and so many different ways to use silicone and wood products. The best part of a creative industry like ours is that we just KNOW you’ve thought of something we haven’t! We’d LOVE to see!!


If you have any questions just comment below OR send us an email to hello@carasupply.com! We’d love to hear from you!!
Happy Crafting!
Xo
- the girls
**The products, materials, and supplies sold by Cara & Co. Silicone Craft Supply are intended for use by adults and should never be left unattended with a child.
***Small objects and beads can present choking hazards to young children. Never leave a child unattended with beads or other products. Always dispose of any damaged product. No product is completely indestructible, and fully formed teeth could potentially damage product if chewed aggressively, so responsible attentiveness is needed for any user or purchaser. Customers should always inspect and monitor their products, discontinuing use at the first sight of damage.
****Once our products have been sold and shipped to our customers, Cara & Co Silicone Craft Supply Inc., waives all responsibility and liability from the use of our products. Customers are responsible that their final products made from our supplies meet the appropriate safety requirements for their region. Our buyers understand that by purchasing our products or using suggestions from the above tutorial, the buyer assumes any and all responsibility and liability for the use of the products.
*****Cords, clasps and pacifier clips are not intended to be chewed on and may present choking hazards.