Between almost 90 standard colors in our silicone rounds, and an amazing selection of shaped Maple & Beech wood beads, there’s no end to the creative fun you can have with craft supplies! But even with all that selection, occasionally we still get curious.

It’s long been on our list to experiment with dyeing our wood beads. We’ve seen coloured wood beads all over Pinterest and you can so clearly tell when a bead isn’t painted. We know how to paint beads, but how do you dye them? How can you maintain the beautiful wood grain of those beads and yet add gorgeous colors and tones to them?


Before you dive too far into your fall & holiday crafting, we wanted to finally test it out. We wanted to try a couple different routes and hopefully find a technique we could recommend! Get those garland and home decor supplies ready - we’re dyeing wood beads!

What We Tried
This blog post is entirely a learning experience for us! We’ve never tried dyeing beads, but we had to start somewhere. A lot of dyeing instructions and tutorials online are specifically for fabric, but there was almost nothing that referred to dyeing wood beads.

If you’ve ever tried painting wood beads with a regular crafting or acrylic paint, you’ll know that unfinished wood is like a sponge. It soaks up all the paint you put onto it almost immediately. Why? Wood is porous exactly like a sponge! It takes liquid and pulls it into its fibers - especially dry wood. So we figured if wood soaks up paint, surely it would soak up dye and coloured liquid just as well.
Part of our aim was to compare similar colors through different types of dyes. With the fall coming up, we chose to test out browns, oranges, reds, pinks & blues. With knowing what colors we wanted to end up with, we turned our attention to how we would do that. We also chose to use our Maple wood rounds - because Beech seems to have a bit of a natural finish to it, we thought it might not soak up color as easily.

We tried three different types of dye: chemical fabric dye, food coloring & natural food dye. We wanted to do fabric dye as a color accurate crafting option, with food coloring and natural dyes as possible options that were safe for small children should they be used in that kind of crafting. So, off we went to purchase all our supplies.
RIT FABRIC DYE
Sourcing fabric dye was extremely easy. Your local craft supply store will stock a selection of colors and possibly a few brands, or you can even find it on Amazon. We chose the RIT brand as it seemed to have the most color & end use options.
The RIT fabric dyes have two product lines: All Purpose Dyes and Synthetic Dyes. Because RIT is a fabric dye, they account for multiple fabric types. Even though wood wasn’t mentioned on the All Purpose Dye packaging, we took a calculated risk and figured All Purpose could also apply to unfinished wood products.


The instructions were quite simple: hot water + measured amounts of dye + time to soak = dyed material. We boiled up water and filled 5 little buckets with approximately 4 cups of hot water. To that we added 3-4 TBS of concentrated RIT All Purpose Dye. We then mixed it with a spoon and added a strand of unfinished Maple wood beads to the bucket.
FOOD COLORING DYE
Food coloring was also super easy to track down. We went to our local grocery store and found this Wilton set of food coloring. You can find very small 5 color packages of food coloring (that cost much less) and follow the instructions on the back for exact proportions for certain colors. However we didn’t want to fiddle too much with the ratios, so we chose a larger pack that had the exact colors we were looking for.

The same steps for soaking were followed: 4 cups of boiling water into our buckets, plus a healthy tablespoon of food coloring to the water. We decided to not do both a red and a pink in this case because we figured, if you wanted pink you could half the amount of dye next time around. We added our unfinished Maple wood beads to the bucket.
NATURAL FOOD DYE
This is where things started out so promising, but little did we know it would be disappointing. We had done some reading on the internet regarding what foods dyed things certain colors. Because we were looking for specific colors, we decided against some obvious natural food dyes (eg. Red cabbage, beets, etc). We decided to try: cherries for red, tea for brown, turmeric powder for orange, black beans for blue and avocado for pink.


Now before you laugh at the black beans and the avocado, some of the stuff we were looking at online looked pretty convincing! We saw some vibrant blues and subtle pinks in the examples we looked up, however the biggest difference was of course that the example tutorials were dying fabric, not beads. The black bean source we had read suggested that dried beans were the best option, so we got both canned and dry to see if there was a difference. Another source suggested avocado peels and pits would dye fabric a soft pink, and it seems the internet lied to us… more on that though.

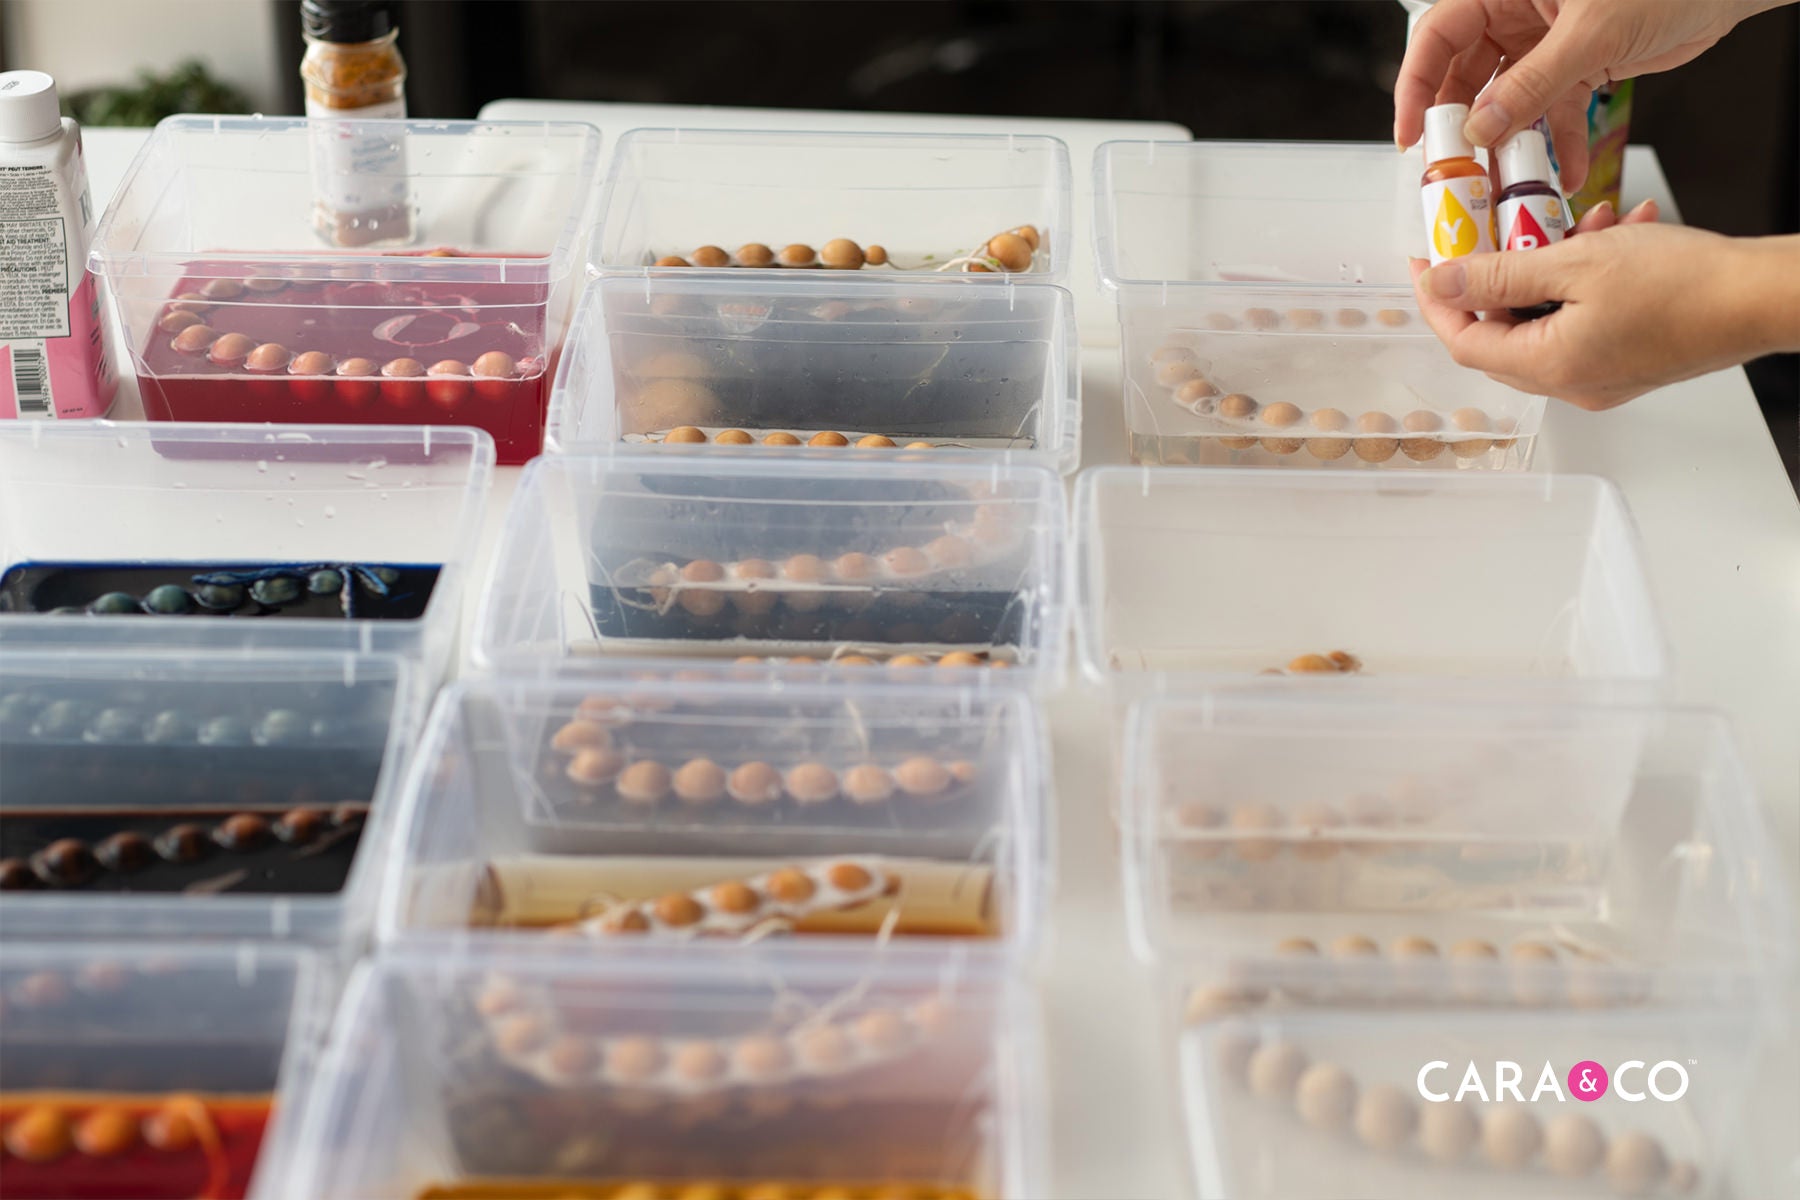
So we dumped our natural dye elements in the buckets (which looked a little gross), added boiling water and a strand of unfinished maple wood beads. We whispered a prayer, closed them up, and assured our coworkers that we had a plan… sort of ;)
What Happened?
After setting all our little bins up, labelling them, and closing the blinds to the office, we left for the night. The beads sat in their dyeing solutions for about 18 hours, which we assumed would be plenty to soak and set their colors.


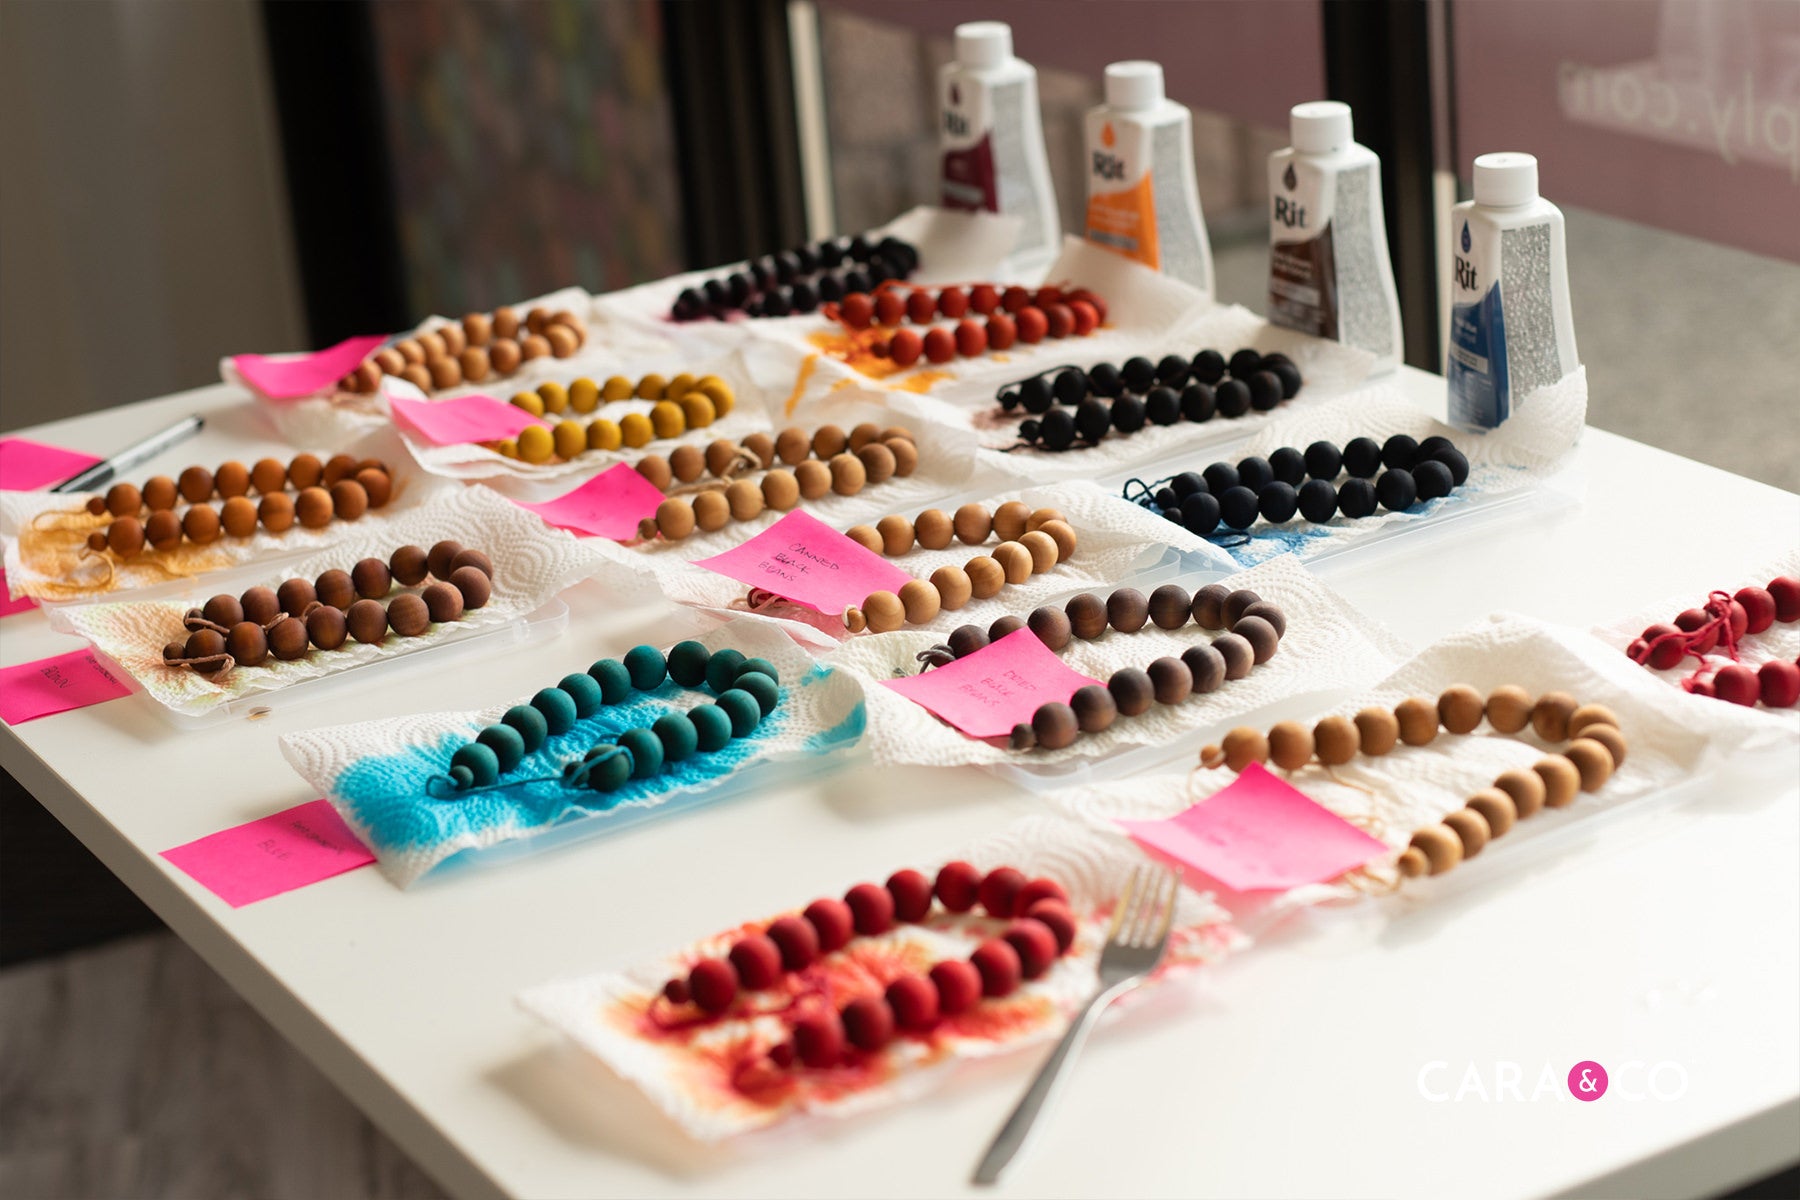
The next morning we started opening up all the buckets to see how things were going. After draining the buckets and setting the beads out to dry, we took stock of what seemed to be working.

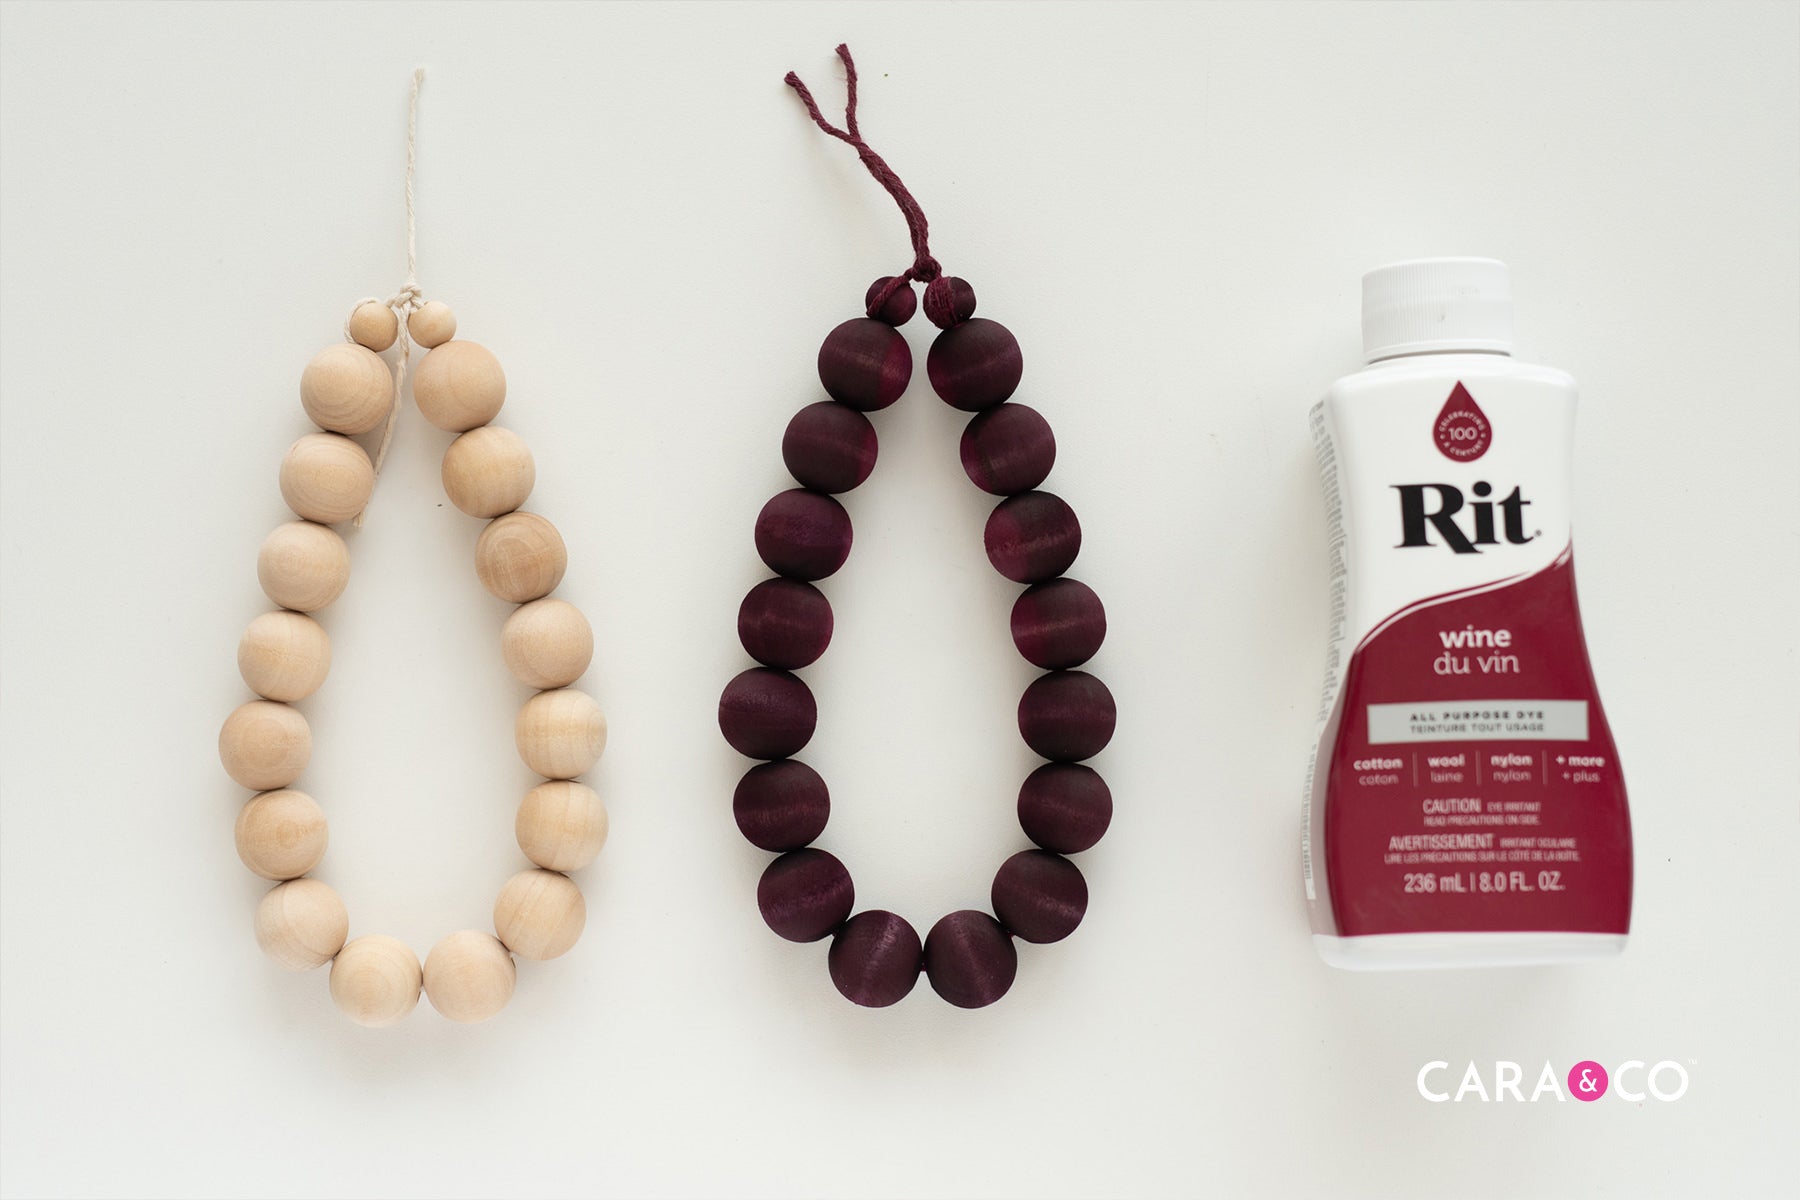
RIT FABRIC DYE
Of the three dyeing methods we were testing, the fabric dye colors were the most vivid and dark. As they dried they lightened slightly, but the colors were deep and beautiful! We were feeling quite encouraged by them! Aside from the pink that really just ended up looking red, they were accurate to the packaging color name. Even the twine binding our test beads dyed the same colors!


We were quite pleased with our fabric dye results! To be clear, these dyes are intended for fabric use, and unlike most fabric dying, we didn’t set these colors with any dye set liquid, but they retained color nicely while still showing the grain of the wood beads!
We imagine these beads would not be able to get wet again as the dye would probably bleed out. One drawback to the fabric dye beads was that we wouldn’t want these to get into any children’s hands. If you’re a mom, you know how quickly even home decor items end up in mouths!


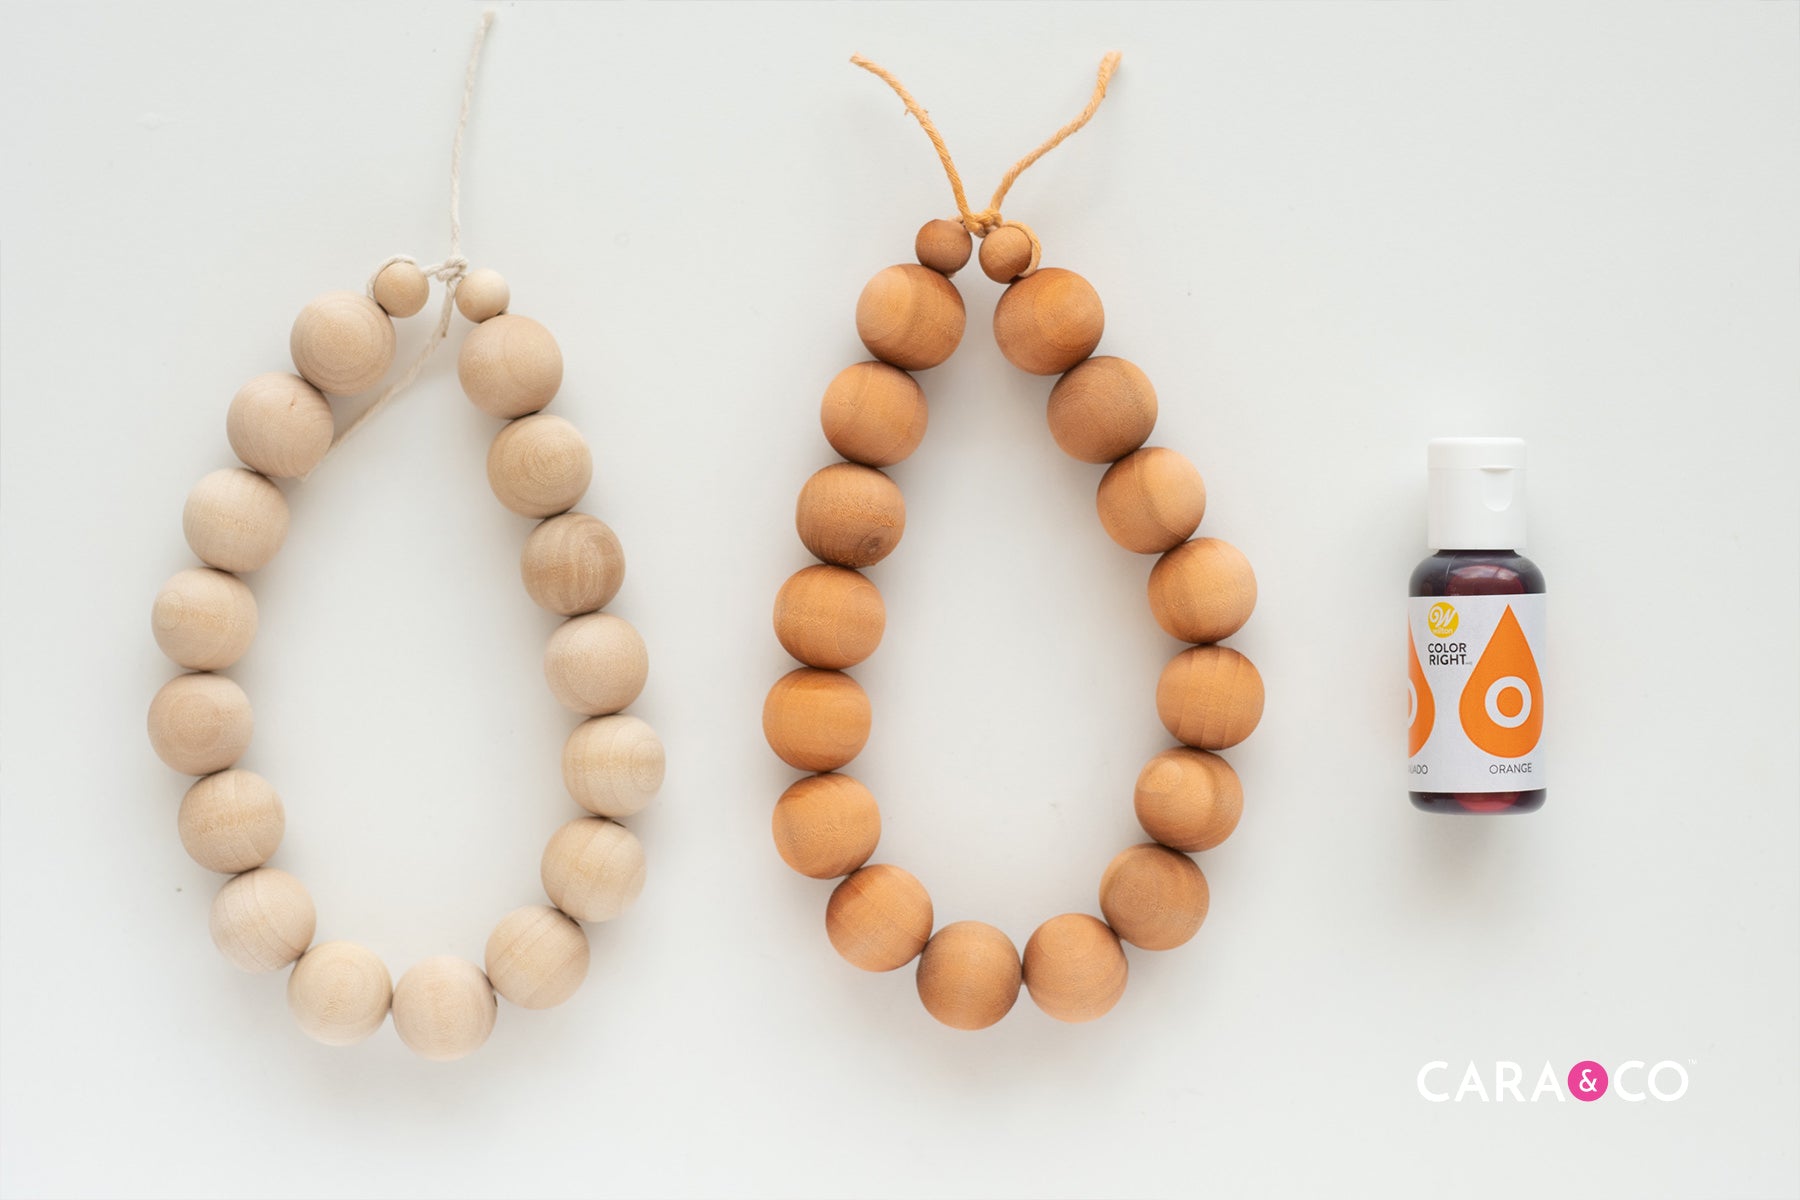
FOOD COLORING DYE
The food coloring dyes were a little less impressive. They still transferred color and dried decently, but the actual colors were quite… awful... in our opinion of course ;) They were orange for example, but not a nice shade of orange. The colors seemed to lack a bit of luster, however if you were going for a less intense color this would probably work well for you.
We did like the idea that these were dyed with something ‘okay’ to eat should a beaded decor garland ever end up in a toddlers mouth.

As with the fabric dyed beads, we didn’t set the colors at all, and they did continue to lighten up as they completely dried.


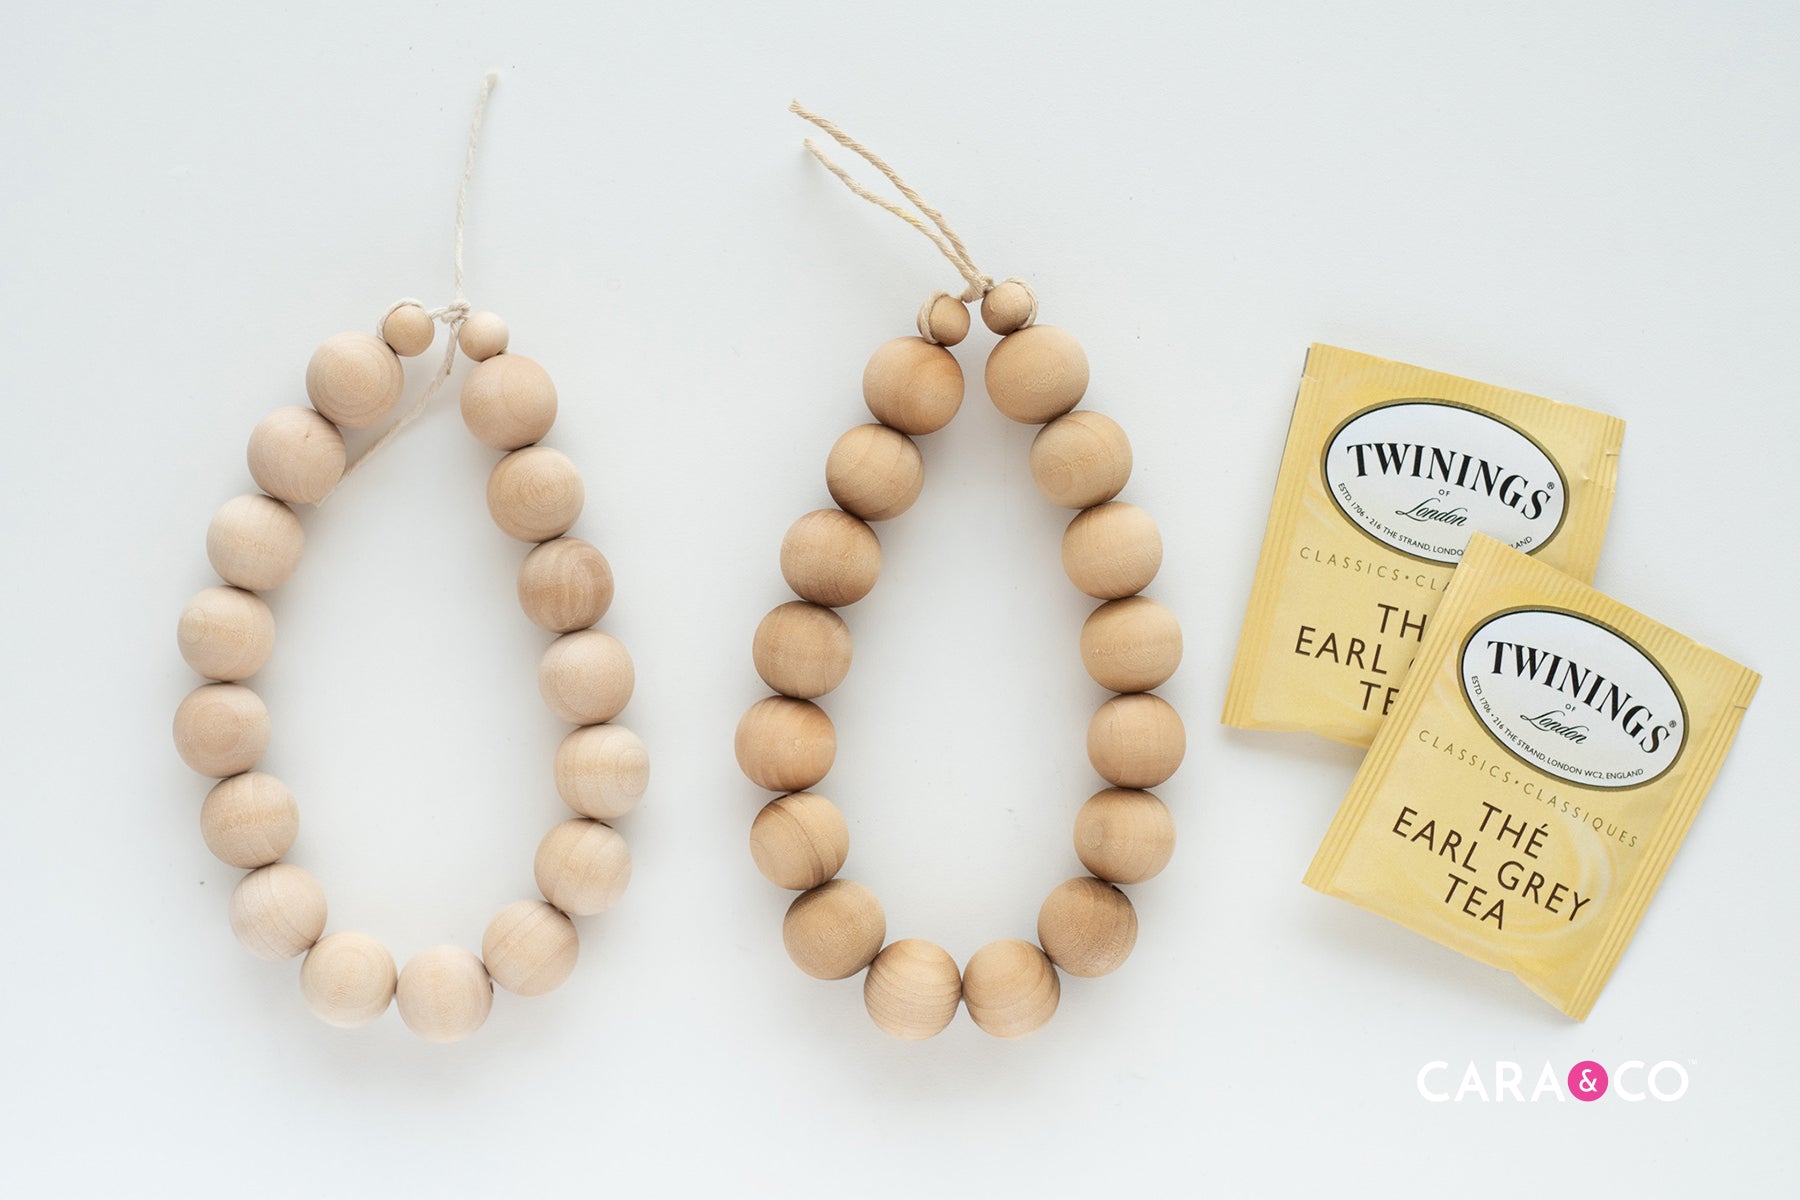
NATURAL FOOD DYE
And now the disappointing part of our (not so) little experiment. Once we removed the lids from these buckets we knew the colors promised were not the colors delivered. It was especially yucky to clean up soaked avocado skins and cherries.
Once our beads dried it was difficult to see the difference between a few of them. The Turmeric turned a brilliant mustard yellow color and was quite beautiful. The tea dye darked the wood color slightly, but without another wood tone to compare to, you might not have noticed. The cherries were disappointing as well! How is it that cherries can wreck all your child’s NEW shirts immediately, but couldn’t do a thing to our wood beads?? Interestingly, the canned black beans did nothing as well, but the dry beans transferred a bit of a blue/grey tone once soaked in hot water. Avocado skins and pits? Aside from a reallllyyy gross looking bin, they were a complete yucky bust. Blech.
These weren’t at all the results we were expecting from the natural dyes!


What Did We Learn?
We were so relieved that we didn’t actually need these beads for anything specific - it gave us the room to experiment and try things out. If we were to recommend anything to someone looking to try dyeing beads it would be:


1. Fabric dyes work. The color soaks in really well, it's accurate, and is foolproof. If we were to do it again, we might decrease the amount of dye we used to soften the colors up a touch.
2. Food coloring dyes aren’t great for wood products. While they soak in color well enough, the colors aren’t very beautiful shades and it would take a bit of experimentation to get them to a place we were happy with.
3. Natural dyes are unpredictable. Something you think will 100% work doesn’t, or gives you a different result than you anticipated. It would take quite a bit of figuring out to make those results consistent.
4. Particularly for fabric or food dyes, you don’t need 18 hours. You could probably dye just as nicely in 6-12 hours.
5. Don’t dye overnight unless your objects are completely submerged. We flipped our beads over as often as we could, but we still ended up with a dye mark on some of our darker shades because they sat for longer on one side.
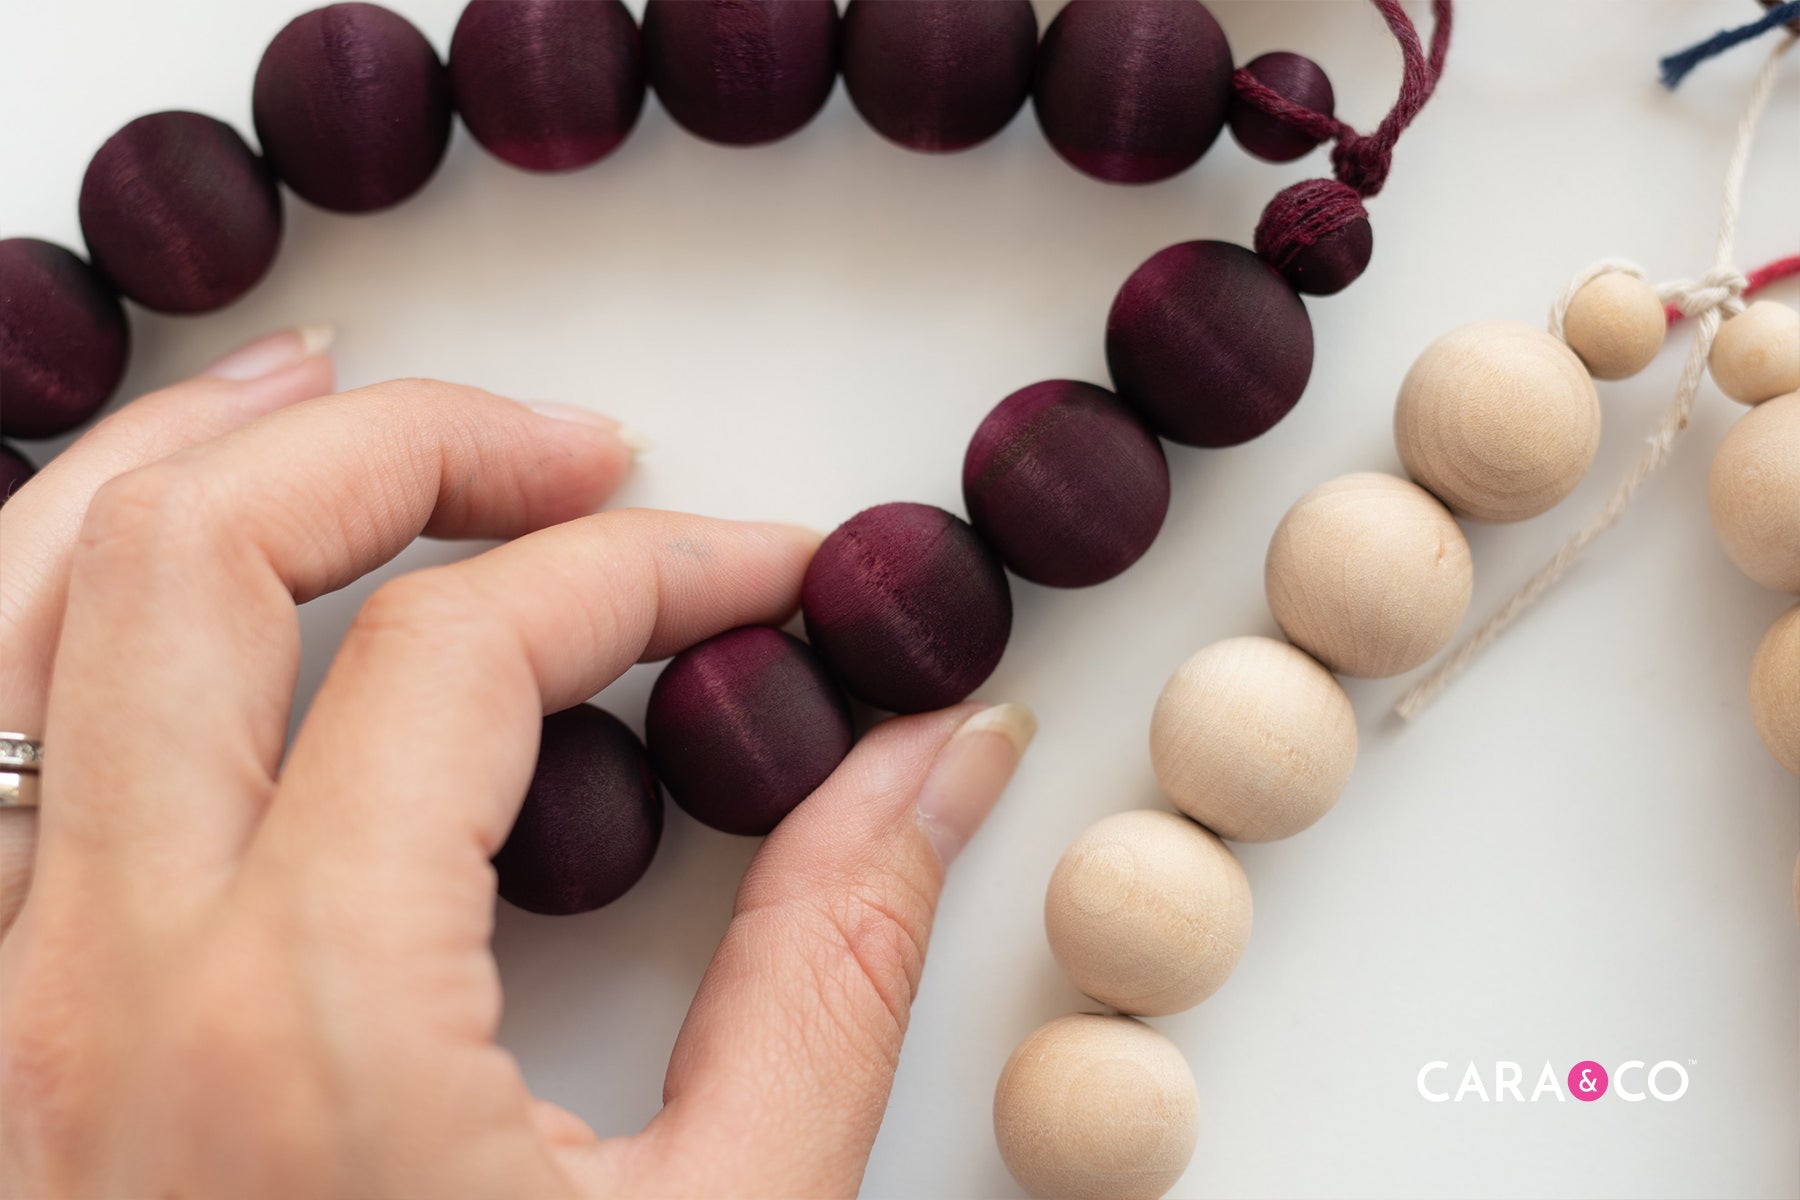

So after all of that work - what do you do with dyed wood beads?? Exactly what you might do with wood beads for your home crafting!
We took our wine coloured fabric dyed beads and made a cute farmhouse garland centerpiece! You could easily dye for larger garlands or even Christmas ornaments! There’s so many options and fun ideas out there!

We hope you enjoyed learning alongside us! If you have any questions, of COURSE send us a message and let us know! We’re new to bead dyeing, but we’ll do our best to answer what we can!

If you take on dyeing your own beads make sure you tag us in your pictures! Tag us using the hashtag #createdwithcarasupply on instagram and you could be featured in our stories!
Happy Crafting!
Xo
-the girls
*The products, materials, and supplies sold by Cara & Co. Silicone Craft Supply are intended for use by adults and should never be left unattended with a child.
***Small objects and beads can present choking hazards to young children. Never leave a child unattended with beads or other products. Always dispose of any damaged product. No product is completely indestructible, and fully formed teeth could potentially damage product if chewed aggressively, so responsible attentiveness is needed for any user or purchaser. Customers should always inspect and monitor their products, discontinuing use at the first sight of damage.
****Once our products have been sold and shipped to our customers, Cara & Co Silicone Craft Supply Inc., waives all responsibility and liability from the use of our products. Customers are responsible that their final products made from our supplies meet the appropriate safety requirements for their region. Our buyers understand that by purchasing our products or using suggestions from the above tutorial, the buyer assumes any and all responsibility and liability for the use of the products.
*****Cords, clasps and pacifier clips are not intended to be chewed on and may present choking hazards.
34 comments
I’ve tried the food colouring method and the beads are not colour fast. The slightest drop of water makes the colour run. Any suggestions to make the beads colour fast? I’ve tried a spray varnish without success.
Thanks
Hi Mindy!
We’re so glad this blog post could be helpful for you! Happy crafting! Xo
Thank you SO much for this post! I am planning on dying some plain wooden bead this week and this was SUPER helpful!!
Hi Marlene!
Thank you for your great question! We haven’t tried re-dying a wood bead that is already a color. However, we imagine it could work well if you followed the same steps in this tutorial. We’d love to know how it works out if you do try it! :) Xo
I have some very pink beads that were given to me. Can I re-dye them black? How should I do this? Thanks so much!