Can you believe Easter is around the corner?? This time of year is always so exciting. Spring is coming, the weather is changing - everything is gearing up for the new season!
We love decorating for the holidays, but after 2+ months of Christmas decor - hands up if your tree JUST came down :S - we’re ready for some spring decor and crafts!
So grab your ribbons, paints, faux flowers, and let's get crafting!


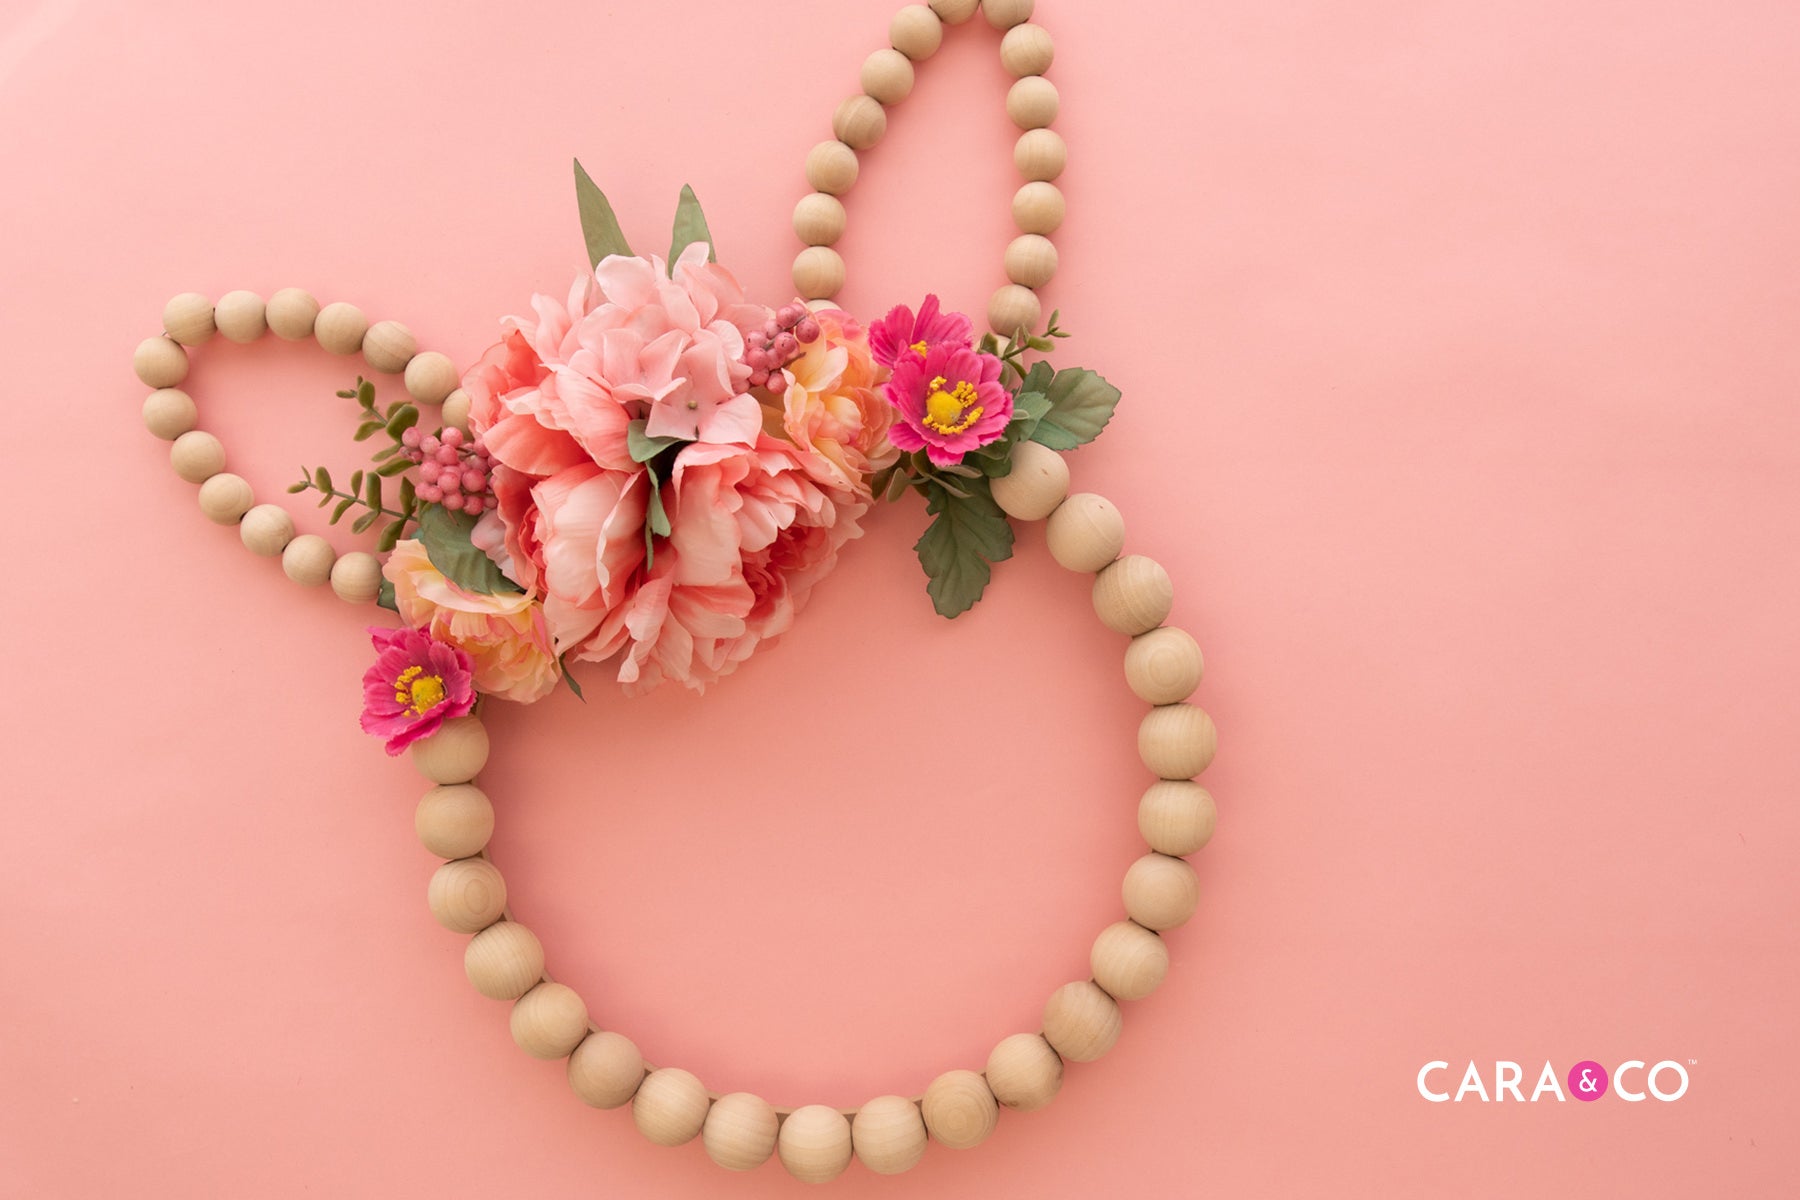
Bunny Wood Bead Wreath
We love creating seasonal wreaths, and this one is seasonal enough to be cute but chic enough to not scream "easter bunny" every time we look at it. It’s tastefully done "easter bunny" in our opinion. ;)
We love a full size wreath, don’t get us wrong, but sometimes the crafting budget doesn’t align with the project we want to take on. The nice thing about a wreath like this, is that it’s scalable! If you want a big wreath for your door or mantel, no problem! Scale up your bead sizes. If you need something a little more modest in terms of cost, we’ve got you covered! Wreath bases come in all sorts of sizes and all you need to do is scale down the bead size you’re using! No one needs to be left out with this craft. :)

The supplies listed below will be for a full size wreath, but check out our notes after the Step-by-Step Instructions for the mini wreath supplies we used.

Supplies Needed:
- 12” Wood Wreath Base
- 18 Gauge Wire
- 21 x 1.25” Maple Wood Rounds
- 18 x 22mm Maple Wood Rounds
- Hot Glue Gun & Glue Sticks
- Cordless Drill & Bit Set
- Needle nose pliers (can be purchased as part of our Crafting Tool Set)
Step-by-Step Instructions:
1. Gather up your supplies. Taking a pencil, lightly mark on the sides of your wood wreath base four holes to attach your bunny ears. Make sure your placement is on the upper half of the wreath, and that each ‘ear’ has two holes approximately 1.5-2” apart.

2. When you’re happy with your placement, select a drill bit that is comparable to your wire gauge so that your wires will fit through, but still be held snug. For our 18 gauge wire, we used a 1/16 drill bit - it was a perfect fit!


3. Lay your wreath base face up on a flat surface and begin hot gluing your large maple beads to the wreath base. Start your beads about ⅓ of the way down from the top of the wreath. We will fill in the top ⅓ with flowers so there’s no need to cover the base completely.

4. When you’re done gluing your large beads, cut two lengths of wire 18” in length. Fold that wire in half and begin to form two curves on either side. This will give you a bunny ear! Make another one for a matching ear.

5. Thread your smaller size wood beads onto the bunny ear, making sure you leave about 1.5-2” on the ends of your wire.

6. Feed your wire through the two pre-drilled holes on your wreath base. You may need needle nose pliers to get them pulled through.

7. Bend your wires as they appear on the inside of your wreath base. This will secure your ears to the base very well. To be sure everything is extra stuck, we’ve also added a line of hot glue to cover our bent wires.

8. Repeat and do the same for the other ear.
9. Cut out a few of your favorite stems of faux flowers and arrange them across the ‘brow’ of your bunny. Hot glue to secure them as well.


If you’d like to make the mini version of this wreath here are the supplies we used that differ from the larger wreath:
Supplies for Smaller 6” Wreath:
- 1 x 6” Wood Wreath Base
- 14 x 22mm Wood Maple Rounds
- 14 x 14mm Wood Maple Rounds
Whether you make a large or a mini version, this wreath will be sure to brighten up your living space/office/home in an instant!

Peg People ‘Bunnies’
Another quick and fun way to use our popular Wooden Peg People? Bunnies! They’re such a fun little craft (for both the kids and you!), and require minimal supplies!

Supplies Needed:
- Acrylic Paint & Brushes
- 1 x Wooden Peg People - Large Woman
- Small Faux Flowers
- Thick Cardstock or Scrapbooking Paper
- Hot Glue Gun & Glue Sticks
Step-by-Step Instructions:
1. This craft couldn’t be simpler! Paint up your Peg Person in your preferred color using acrylic craft paints and allow them to dry completely.
2. Cut out the shape of bunny ears from your cardstock. Helpful tip: Draw an extra long and pointy heart!

3. Hot glue your ears to the back of your peg person’s head.

4. Adorn your peg bunny with 1-3 tiny faux flowers and that’s it! You’re done!

Fabric Bunny Toy
In this blog we’ve looked at something you can make for yourself, like a wreath, something you can make for older children, like your peg bunnies - what about that little baby in your life?

We’ve got you covered! Last year we developed a tutorial for making an adorable Fabric Bunny Toy, and we had to include it in this blog post. You can visit the tutorial here!

It’s such a cute, quality baby toy! Make one for your own baby, your friends, or maybe try making them for your next Spring Craft Show! They’re so sweet!

Easter is such a fun time of year and we’re so excited to usher in the warmer weather and spring flowers! Bring the outdoors indoors and have some fun with your crafting this Spring season! Be sure to tag us using our hashtag #createdwithcarasupply, or send us images via our social media!
Happy Crafting!
Xo
-the girls
*The products, materials, and supplies sold by Cara & Co. Silicone Craft Supply are intended for use by adults and should never be left unattended with a child.
**Small objects and beads can present choking hazards to young children. Never leave a child unattended with beads or other products. Always dispose of any damaged product. No product is completely indestructible, and fully formed teeth could potentially damage product if chewed aggressively, so responsible attentiveness is needed for any user or purchaser. Customers should always inspect and monitor their products, discontinuing use at the first sight of damage.
***Once our products have been sold and shipped to our customers, Cara & Co Silicone Craft Supply Inc., waives all responsibility and liability from the use of our products. Customers are responsible that their final products made from our supplies meet the appropriate safety requirements for their region. Our buyers understand that by purchasing our products or using suggestions from the above tutorial, the buyer assumes any and all responsibility and liability for the use of the products.
****Cords, clasps and pacifier clips are not intended to be chewed on and may present choking hazards.